Zooming In on Flexibility Part I


We’ve talked about prime lenses and the difference between primes and zooms.  But we haven’t touched on zooms.  Yet.  But we’re about to enter the dark side.  They have cookies.  So now that we’ve had a cookie, let’s talk about having our cake and eating it.  Metaphorically speaking of course.  

The ability to zoom in on a subject, be it in photography or in conversation has become such an ubiquitous saying.  Zooming in on the details in a conversation.  The image evoked is fair though.  A zoom lens allows us to zoom in visually. 

I might even go as far as to describe them as a guilty pleasure.  That kind of thing that gets results but leaves you feeling a little dirty afterwards, and you feel like you have to justify why you couldn’t just use a purer prime.  Well sometimes you need the versatility of a zoom.  It means you have to take less kit to weigh you down.

This article started as a single piece of writing, and then going more in depth, it has morphed into a series of two articles.  I have a lot of information for you, and it might be easier to digest as a two part story.

The Zoom lens work flow

A zoom lens is more than an investment, it is akin to having four lenses in one support.  One going from 16mm, 24mm, 28mm to 35mm, another from 24mm, to 35mm, to 35mm, to 50mm, and onwards and upwards to 70mm.  Roughly translated you’re getting more glass for your buck, which sounds very enticing.

Advantages and disadvantages

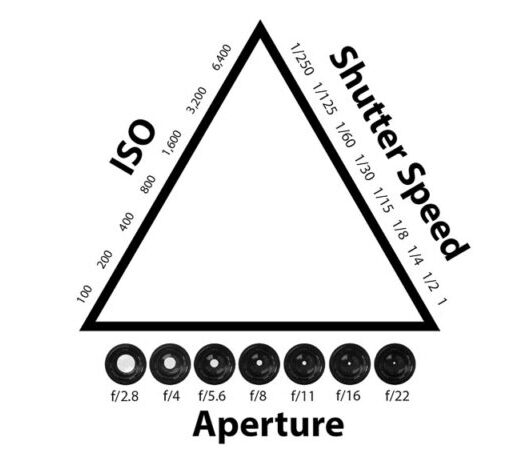
 As in all photography, everything is a matter of balance though.  Ok, you may have more glass, but instead of creamy f1.8, f2.0 creamy bokeh, the trade off will be f4 bokeh, while still nice isn’t as creamy.  You might find f2. Bokeh but you’ll be paying many more bucks.  The difference in price between the Canon EF 16-35mm f/4 L IS USM and the Canon EF 16-35mm f/2.8 L IS USM is around 1000€ which doubles the price of your lens.  This basic economics speaks volumes to me.  

The different focal lengths in just one place allows you to adapt more quickly to a changing situation rather than “faffing” about changing multiple lenses multiple times.  Just one turn of the focal ring, and you’re good to go.  So you’re more available to contemplate a scene and not miss a thing.

They are generally larger than the more subtle nifty fifty, and the general public will take you for a “pro” and wonder why you are pointing a massive obtrusion towards their face.  Some zooms are of course less imposing than others, but you might have to explain more about what you are doing.  

The types of Zooms  

I have talked about the concept of a zoom lens as being a collection of different lenses in just one lens.  In the next article I will describe the example of each zoom I  use, but here I will do the introductions.  We don’t want to get ahead of ourselves.

For me, there are three types of zooms, the wide angle, the general, and the telephoto.  So three types of zoom tend towards three types of application.

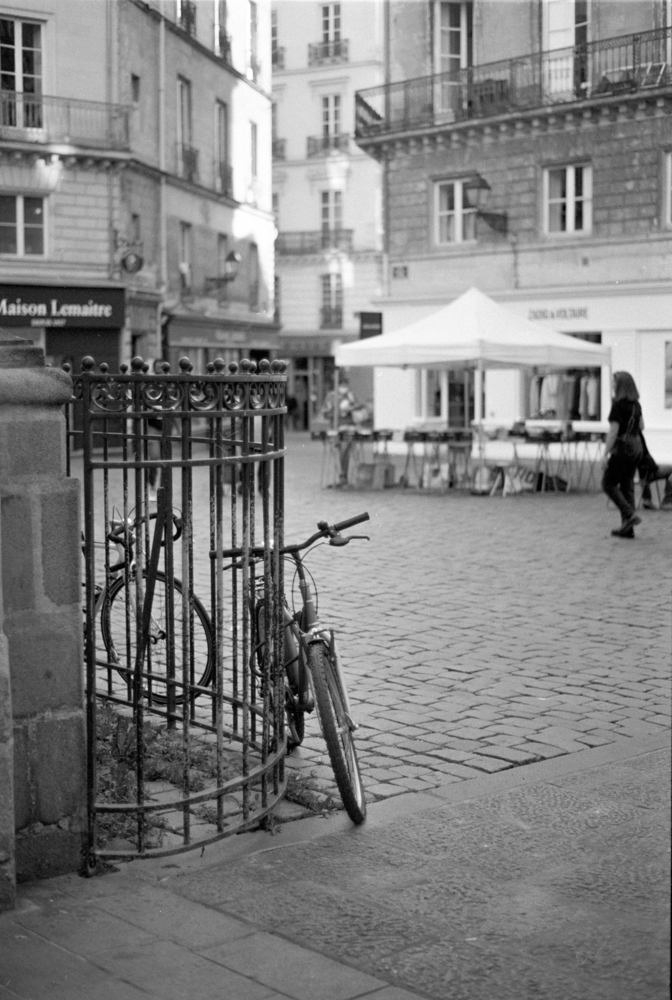
The wide angle zoom offers you a wide angle of view, and its downfall of image distortion can be made the most important feature allowing you a means of getting creative in your images.   You can go from those beautiful vistas so beloved of landscape photographers, to those of us who seem to have an obsession with taking close-up photos of bicycles and helping the audience see the world in a more non-conventional or even exciting way.  

The general zoom, is as its name suggests a zoom that has you covered for general scenarii.  The focal lengths are the ones most commonly used.  It’s great in a street photography or documentary environment allowing you to easily glide between wider and narrower views.  Even though the aperture may not be as important as in primes, the image stabilisation helps the photographer when the light becomes more challenging. 

The telephoto zoom allows us to be closer to our subject whilst at the same time being a greater distance.  Useful not only for wildlife photography, but also for sports photography where the players are on the pitch and not the photographer!

Conclusion

Now we are on the same page and have a greater idea of what the whole situation is and how these solutions can help you as a photographer, be that a beginner, an intermediate, or a more advanced photog.  I talk about guilty pleasure, but when push comes to shove, the viewer of your photography doesn’t care.  They care about the image and how it makes them feel.  The fact that we used such and such a  lens is just speaking to them in a foreign language.  We’ve talked about the trade offs but also the benefits of zooms and in my next article I will talk about my set-ups and the experiences I have when shooting with these lenses..

Prime vs Zoom Lenses: Choosing the Right Lens for Your Photography


Good evening Dear Reader.  We’re back delving  into another series of articles where I will talk shop.  Mother, if that doesn’t interest you then consider yourself warned.  I will, as the title of this article suggests, be talking about the differences between zoom and prime lenses.  I too, many moons ago, was a beginner photographer, and just starting out with a Praktica MTL3, with a 50mm F1.8 lens, and a Helios 135mm F2.8 lens.  An SLR because in 1987 a DSLR did not exist.   This was my first lot of “gear.” That was then and this is now.  2024.  When buying a “starter” camera, “they” will try and flog you, or offer in a bundle what has become known as the ubiquitous “kit lens.”  Otherwise you will be gazing upon a “huge” array of lenses with some “huge” prices to go with them.  This will generally be included in the more “accessible” range of cameras.  It certainly was for my Fuji XT2 18-55mm zoom lens (24-70mm equivalent for full frame sensor).  Don’t get me wrong, I use my 18-55 lens on my Fuji XT2 and like using it.  BUT, when I bought that camera I bought a 24mm equivalent prime lens for it.

This raises the question about what is a prime lens and what is a zoom lens.  A prime lens is a lens that has a fixed focal length.  A zoom lens allows you to vary this focal length and “zoom” in and out.

Advantages of Prime Lenses

Superior Image Quality

You will generally find that you can obtain a “sharper” image with a prime.  Some of the older lenses and ones that we used in film photography are slightly softer, but we were fine about it then, and this quest for modern sharpness seems to have become more important.  In digital photography, this new and thoroughly modern technology will lead to less distortion, and chromatic aberration, which is indeed an aberration where you might get a blueish outline around the subjects in your shots.

Wide Aperture Capabilities

I touched on the concept of aperture in my Photography 101 article.  The aperture is the hole that allows light to expose the film or your camera sensor.  The larger aperture (indcicate by a smaller f number) allows two things.  More light to hit the film, therefore allowing us to shoot in lower light,  and the separation of the subject from the background by getting that “creamy” bokeh beloved by so many of us. 

Compactness and Portability

The “average” prime lens is more “compact” than the average zoom lens.  Effect number one of this is that you can fit more primes into your camera bag and it will probably be lighter.  Think about what I said in my street photography article.  A camera with a smaller lens is also less threatening than having a massive thing thrust in your face.  Being less threatening is always good, and makes the photographic experience more pleasant for everyone.

Creativity and Artistic Expression

When using primes every shot becomes more deliberate.  The choice of which prime to use becomes more important.  You “zoom” with your feet and not with the lens. I have talked about this mindfulness in my photography tutorial series.   

Advantages of Zoom Lenses

First of all we have to talk about what a zoom lens is.  Well, it’s a lens that allows you to zoom.  Sorry about that, I couldn’t help myself. On a more serious note, it is a lens which glides through a series of focal lengths on the same lens.  I have three zooms for my DSLR, a 16-35mm f4, a 24-70mm f4, and a 70-300 f4 – f5.6, and the 18-55mm (24-70 full frame equivalent) kit lens for my Fuji XT2. With three lenses I am covered from 16mm to 300mm, which for me is a big deal.  My 16-35mm has me covered for wide angled vistas of the Place Cambronne in Nantes, and those distorted obligatory bike shots, to general street photography.  My 24-70 f4 even has a macro function offering me even more versatility.  I would class it as my events lens and can double for street photography, and even street portraits.  It’s a veritable work horse of a lens and was what I used when I talked about spring.  My 70-300 lens is for when I can’t get near enough to my subject without spooking it, be that my children messing around next to the river, or taking shots of cormorants sunbathing on the river Erdre in Nantes.

Convenience and Ease of Use

In my previous paragraph I talked about the different focal lengths that I have with each zoom lens.  At the moment in my camera bag I have my Fuji X100F and its 35mm equivalent f2 lens and my Canon 6D Mark II and my 24-70mm f4 lens.  It means carrying less equipment and being prepared for a variety of shots when on the streets or taking photos for my work.  It also provides for less “faffing about” which is something I love to avoid in general, unless I am prepared mentally and ready for it.

All-in-one Solution

Instead of having a different lens for each situation, I have a solution in my bag that allows me to adapt.  Why buy three lenses when I can have a multitude of possibilities with just one lens?  They might seem expensive, but when you are not a professional, cost is something that has to be taken into account, otherwise you have to be very good at communication with your spouse justifying all these purchases.  Happy wife, Happy life.  Happy Husband, we’ll see about that!

Image Stabilisation

In the last paragraph, I talked about stable marital life, and on my zooms I have image stabilisation, which will allow me a more stable shooting of an image.  In the Photography 101 article I talked about having an exposition of nothing lower than the focal length.  IE with a 50mm lens I should not shoot lower than a 50th of a second to avoid camera shake and therefore a sharper image.  This stabilisation offers me about 4 stops extra to play with, be that having a longer shutter speed, or having a larger aperture and therefore getting more in focus in my image.  

Conclusion

I have talked about how this photography lark is all about give and take.  This is so true in the exposition triangle where everything is a question of balance, but also true in the case of lens choice.  Some will be more expensive but give you more control, and others will offer you more ease of use and versatility. You are the one who ultimately has to decide on what camera gear you need (more than want).  What is most important to you?  How will the lens help you?  What is your budget?  

When all these questions are answered honestly then you will be well on the way to having the kit you need, to do the type of photography that you want to do.  

What would I advise a novice for their first acquisition?  I would say the nifty fifty.  The 50mm is closest to what the eye sees.  This prime generally offers an opening of F1.8 which gives you that sexy bokeh.  

Ultimately the choice is yours alone.  But this simple guide may help you reflect and question yourself and allow you to make a deliberate well thought out decision.  The most important thing is to get out there with your camera, start making memories and training that beautiful eye of yours!

Choosing the Right Film Format: 35mm vs. Medium Format Photography


Introduction In the world of film photography, the choice of film format can significantly impact the results you achieve. Whether you’re an aspiring street photographer or simply an enthusiast looking to explore the world of analog photography, the decision between 35mm and medium format can be crucial. This article explores the major differences between these two formats, helping you along on your photographic journey. As we dive into this discussion, it’s essential to understand how the choice of format can influence your work.

1. Understanding the Basics Let’s start by establishing a foundation. 35mm photography is the more common format, known for its accessibility, ease of use, and widespread availability. It is the standard format of film. However, medium format photography offers distinct advantages worth exploring.

2. The Key Differences

Image Quality and Resolution: The most noticeable difference between medium format and 35mm photography lies in image quality and resolution. Medium format film, with its significantly larger negative size, captures an significant level of detail and clarity. The larger negatives provide ample room for precise rendering of textures, fine lines, and intricate patterns. This translates to stunningly sharp and highly detailed images, ideal for both professional work and fine art photography. If you’re aiming for prints that capture every nuance, medium format is the way to go.

Aspect Ratio: Another significant difference is the aspect ratio. 35mm film typically yields images with a 3:2 aspect ratio, while medium format cameras typically offer a square 1:1 aspect ratio. The square format can be a creative boon, pushing photographers to rethink composition. It forces a balance between the vertical and horizontal aspects of your subject, a characteristic reminiscent of the iconic street photographer Vivian Maier, who frequently used a TLR camera. The square format encourages unique framing and adds an artistic challenge to your photography.

Depth of Field: Medium format allows for a shallower depth of field compared to 35mm. This means that it’s easier to achieve that sought-after background blur or bokeh, perfect for portrait and street photography. With a well-executed composition, your subject can pop against a beautifully blurred backdrop, making them the focal point of the image.

Size and Weight of Equipment: In terms of portability, 35mm cameras have the upper hand. They are compact, lightweight, and ideal for street photography where you need to be quick on your feet. Medium format cameras, on the other hand, tend to be bulkier and heavier due to the larger film format and the associated optics. This makes them better suited for planned shoots where image quality takes precedence over convenience.

Cost of Film and Development: While 35mm film and development are more budget-friendly, medium format film comes at a higher cost. When using the 6×6 format you will only have 12 images per roll of film. This of course makes every shot count. If you are stressed out about messing up a shot on 35mm film then your anxiety will shoot up to lunar levels with only 12 shots. But remember what I have said earlier, no shot is wasted and every shot is a learning experience. The enhanced image quality, detail, and artistic potential make medium format film worth the investment for those who prioritize the final result over the upfront cost. If you’re planning to produce gallery-worthy prints or pursue a professional career, the expense can be justified.

Flexibility and Convenience: 35mm cameras are known for their flexibility and convenience, making them well-suited for capturing quick shots or candid moments. They’re also readily available, and film processing is more accessible. In contrast, medium format cameras require a more methodical approach, ideal for planned and deliberate photography. The process is slower, encouraging you to carefully consider each shot and compose it meticulously. This added effort can lead to more thoughtful and deliberate photographs.

3. Street Photography with the Pentax ME Super and TLR Influence Vivian Maier, a renowned street photographer, serves as an inspiring example of how camera choice can shape your photographic style. Maier favored the TLR camera, a medium format model known for its distinctive qualities. Her use of the square format and unique perspective have left an indelible mark on street photography.

I want you to think about the fact that a TLR is hanging around your neck at tummy level or even waist level, so the way of looking at your subject will automatically affected too.

If you’re looking to explore street photography with a Pentax ME Super, remember that the compact 35mm format offers its advantages for candid, on-the-go shots. However, Maier’s work reminds us that the choice of equipment is a personal one, and there’s no one-size-fits-all answer.

4. The Mamiya C220 Review: A Medium Format Marvel As we venture further into the world of medium format, the Mamiya C220 beckons. Just as Vivian Maier chose a TLR for her street photography, other photographers have found success with medium format cameras like the Mamiya C220. In my upcoming review, I’ll explore the features, benefits, and considerations of this remarkable medium format camera, guiding you towards your next photography adventure.

The Induction to a Higher Level of Photography When you make the transition from 35mm to medium format, you’re stepping into a higher echelon of photography. If you think that 35mm film is great, you’ll be enthralled when you see your images taken by a medium format camera. The level of detail and depth of field that medium format offers is simply unmatched. It’s like upgrading from a standard screen to 4K resolution for your photography. Every detail comes to life, and the depth of field adds a whole new dimension to your work. It’s a revelation that will leave you wondering why you didn’t make the leap sooner.

The 35mm format photo captured on the Pentax MS Super. The “standard” format of film photography. The one we all know.

The square format common to much medium format photography with a 6×6 format. I’ll let you look at the differences for yourself.

The lenses for each shot was a 50mm lens for the 35mm format film photo, and the 80mm mm lens for the medium format photo. However, both lenses are equivalents.

Conclusion In closing, remember that there’s no definitive answer to the question of 35mm vs. medium format. It’s a matter of personal preference and artistic vision. Both formats have their merits, and your choice should align with your goals and the style of photography you wish to pursue.

Stay tuned for the Mamiya C220 review, where I’ll delve deeper into the world of medium format photography, and consider the impact of the TLR on your creative journey.

The journey of film photography is full of exciting choices, from your film format to your camera model. Vivian Maier’s legacy reminds us that every camera has its unique personality and that your creative vision should be the driving force behind your choices. Whether you decide on 35mm or medium format, your camera is your artistic tool, and the world of film photography is yours to explore.

Frame It Right: The Art of Composition in Photography Part IV


In my previous articles, we’ve embarked on a journey to understand the basics in photography. I have talked about exposure, set out some of the “rules” of composition, and even delved into the world of colour theory. Today, I’d like to introduce you to the rule of odds and the rules of space, two fundamental elements that will take your photography to the next level.

Before we talk about these new concepts, let me reiterate the importance of building a solid foundation. Just as we did with framing, negative space, and colour theory, it’s crucial to master each concept before moving on to the next. Take your time to learn and apply these principles in your photography journey. The other four articles will stay up, and you can read them at your leisure.

The Rule of Odds in Photography

The rule of odds is a composition guideline that suggests using an odd number of subjects or elements in your frame, typically three or five, rather than even numbers. Why? Because odd numbers tend to create a more balanced and visually pleasing composition.

When you use the rule of odds, you create a natural focal point within your photograph. Our eyes are drawn to the centre subject, and the uneven arrangement adds a sense of harmony and intrigue to the image. The result? A more captivating and dynamic photo that engages your viewers. It’s all about balance.


Rules of Space: Balance and Direction

Now, let’s look at the rules of space. This concept involves how you position elements and subjects within your frame to achieve balance and direct the viewer’s gaze. It leaves space for the subject and can be used in multiple ways as a storytelling tool. It can also be used in conjunction with the other composition techniques that I have talked about in my previous articles.

Tips

Think outside the frame. What is going on outside the frame becomes as important as what is oing on inside the frame. Let’ take the picture of the guitarist. Who is he looking at? What’s going on outside the frame? Is there an audience? Where is the audience? Using rules of space the viewer will more curious and be more engaged in the photo.

Conclusion

One can talk about composition and the effect it has on photography till the cow come home. People will always bring up “composition” and will always tell you how “they” would have done it differently. In these four articles you will now know what they are talking about and be able to decide for yourself. In absolute terms, “your” photographs are about what “you” saw, and only “you” can see that. But keep the rules that we have discussed in the back of your mind, and take your photograph with purpose and being conscious about what you are doing. Mindfulness is the key.

My next article will talk about the differences between 35mm film photography and medium format photography. For film enthusiasts or anyone else who is curious you will be entering into a new world. There are, of course, trade offs between each format, and we will discover them. Maybe you’ll be bitten by the Medium Format bug too… As always Dear Reader, I appreciate your enthusiasm, and I look forward to our next exploration together. Until then, happy shooting!

Frame It Right: The Art of Composition in Photography Part I


In my last article we talked about exposure, and balancing the elements that form the “exposure triangle”, i.e. the sensitivity of the film that we’re using, of the ISO setting on our camera sensor, the shutter speed, i.e. how long we let the light hit the film, or camera sensor, and aperture, i.e. the size of the hole that light comes through measured in F-Stops.  When these elements are in perfect osmosis, we should get a decently exposed photograph. 

Introduction to composition principles

Now we shall take this knowledge and build upon it with notions of composition, i.e. how we will organise the elements in our photograph.  Sometimes we have control of where these elements are, for example when creating a still life image.  Other times we have no control whatsoever and just have to move ourselves instead.  The way we do this is by thinking about our “Composition.”

As humans we are all guided by rules, some universally moral, some defined by the country we live in (like in France where they seem to be forbidden to make a decent up of tea), and Art is no exception.  There are rules in Art that make an image pleasing naturally to the eye, and, believe it or not, these “rules” have been around for a long time.  Now I hear you little rebels sat at the back of the classroom near the radiator saying how you don’t live by rules, and that you break every rule in the book.  And I have no problem with that.  I would however suggest you learn the “rules of composition” first and then, and only then break them knowingly.

Photography is art made with light, and the first photographers were heavily influenced by the art and paintings in the local Art Galleries.  They therefore had a very “classical” notion of composition.  I want you to imagine those massive oil paintings in a gold frame showing a Victorian gentleman looking over the top of a waterfall, framed by the forests, and still looking so dapper.

The Rule of thirds

This is one the first things that people will talk about when talking about composition.  The idea, as the name suggests is to divide a photo equally into thirds horizontally and vertically, and put the point of interest (subject) where the lines intersect.  Or you could have a landscape photo where sky will take up two thirds of the photograph and the foreground the other third.  In editing software, when framing you shot they will put a three by three grid on your photo automatically.  Some digital cameras allow the use of this grid inside the viewfinder.  When taking a portrait you would ideally have the eye where the lines cross.  Yes Ian, but this has been done, done, and done again, and has become a cliché I hear you say.  Possibly, but it works mate!  Don’t knock it.  As I said earlier, learn the rule, master using the rule, and then you might consider breaking the rule, but it will be a conscious decision and above all, deliberate.  But it will permit a pleasing and natural result.

Leading Lines and Perspective

Leading lines are lines that lead the eye into the photograph, turning it into something dynamic.  The lines will converge on a certain point in the image, which, if you want, can be on the grid that I described in the last section.  This point is the vanishing point, and give geometrical forms to your image, and can lead to the subject of you photo.  When using straight lines,you can emphasis to shapes in architecture and acquire a very “graphic” image.  Using a wide angled lens or even a fish eye lens will emphasize these line even further and the distortion of these lenses will add even more interest to your image.  I will talk about the most common lenses in a future article.  We’re not there yet. The lines don’t have to be straight, they can be curved or S shaped.  Think of a winding road in the countryside.  Whichever version you use, there will be a feeling of being drawn in to the scene. 

In the first photograph of the original Pegasus Bridge all the lines converge to a central point with a person standing which gives us an idea of the scale of the bridge.  These straight geometrical lines give a feeling of stability and solidity. 

In the second photograph, we can see an image that uses an S curve, and as you can see, the effect is totally different.  More subtle, but they eye is still drawn in to the image.

 Leading lines can appear in nature and in the landscape.  Look at the way that the tree line and lines in the mountains converge on a specific part of the photograph and show the different layers of the photograph. 

I seem to use them in quite a few of my photos, and with time, you won’t even have to seek them out.  You will be lead…

Symmetry in photography

In last week’s article we talked about exposure and how it is a balancing act between the three elements: film sensitivity, aperture, and shutter speed. We can find this symmetry in our compositions too. 

Symmetry in photography is a fundamental principle that enhances the visual impact of images. It involves balancing elements on both sides of a central axis or point. There are various types of symmetry, including horizontal, vertical, radial, and bilateral, each offering unique opportunities for creating appealing compositions. Symmetry naturally draws the viewer’s eye, adds stability, and is particularly useful in architectural, landscape, and macro photography. However, breaking symmetry with a contrasting element can introduce tension and creativity. By framing subjects thoughtfully, adjusting camera angles, and recognizing symmetry in both natural and man-made subjects, photographers can master this powerful tool for captivating compositions.

In summary, symmetry in photography is about creating balance and harmony through the arrangement of elements within the frame. It provides a sense of order, highlights patterns, and engages viewers, while also allowing for creative deviations when necessary to convey a specific message or emotion.

Conclusion

Firstly let’s not be fixated by these rules. I was right to describe them as “guides” to composition.  Talking about them is fine, but we have to put them into action.  Don’t try to do them all at once.  Take one rule.  Look at it closely.  Think how can I use this one rule?  How can I master it, or at least take it on board.  When you think that is is engrained into your mind, then start using a different concept.  I can’t stress that when learning, take your time.  Let the concept become second nature.   

There will be occasions when you feel that you are no longer advancing in your composition, but stick at it.  You will not obtain mastery after just one outing.  I’ve been doing this for 40 years and am still learning something new each time I go out with my camera.  People talk about being on a photographic journey, and that is a very good way of looking at it.  You can’t run before you can walk.  Don’t let yourself be overwhelmed by what you might see on Instagram, or even on this blog.  We are all at different places on this path.

In next week’s episode we will explore framing, negative space, colour theory, texture.  There will be a third article to cover pattern and repetition, scale and proportion, depth and layering.  There are so many points to talk about in composition that we may even have a fourth article but we’re not there yet! 

See you next week.  Until then, keep shooting!

Photography 101: Mastering the Fundamentals


Why Photography?

Hello, Dear Reader,

I’ve decided to take some advice and start a series of articles focused purely on photography. You may already know how photography has impacted my life, and perhaps you’re hoping to discover something similar for yourself. This isn’t a formal course, and the advice I share comes from my own experiences over the years. My aim here is to offer you a useful reference point as you begin or continue your own photographic journey.

Let’s assume you’re new to photography and want to move beyond using your phone’s camera. You’re ready for a “real” camera. Does that sound about right?

From time to time, people approach me and say, “Ian, what’s the deal with photography? How do I get photos like yours?” That’s when my imposter syndrome likes to make an appearance. But despite that, I’m here to share what I know.

To begin, you’ll need a camera. I know it can feel overwhelming, especially if you’ve glanced at the price of a Leica and wondered if it’s worth selling a kidney. (Pro tip: hold off on that.) Leicas are beautiful, but you don’t need to break the bank to get started.

Any camera within your budget is a good starting point, especially if it allows you to control settings manually. Whether you choose film or digital, the fundamentals remain the same. Do you want the retro charm of a Canon AE1, the compact style of a Fujifilm X100F, or perhaps a more professional DSLR? The choice is yours, but remember: the camera is just a tool. It’s how you use it that matters. I’ve written some camera reviews you can check out, and I plan to add more in the future.

Now, let’s talk about the basics.

Exposure Basics

Photography is essentially about light—how much of it reaches your camera’s sensor (or film) and how it interacts with your subject. Too much light, and your image will be “overexposed” (too bright). Too little light, and it will be “underexposed” (too dark). You can, of course, play with these elements intentionally, using over- or underexposure to highlight specific areas of your shot. Photographers often talk about exposing for the highlights or shadows to get the right balance. In film photography we will expose for the shadows and in digital photography we expose for the highlights.

How do I control the light?

It all comes down to balancing three key elements, often called the “Exposure Triangle”: ISO, shutter speed, and aperture. Adjust one, and you’ll need to compensate with the others. Let’s go through each of these in turn.

Exposure triangle, showing the effects of aperture, shutter speed and ISO

Understanding ISO

ISO controls your camera’s sensitivity to light, crucial for getting the right exposure in your photographs. In film photography, it’s referred to as ASA, but the principle remains the same.

  • Lower ISO Settings (100-400): Ideal for bright conditions, such as sunny days, as they produce images with minimal grain or “noise.” For example, using ISO 100 outdoors on a clear day will give you crisp, clear shots.
  • Moderate ISO Settings (400-800): These settings are suitable for cloudy days or indoor lighting. Using ISO 400 allows you to capture good quality images without excessive grain, but expect some visibility of noise when using ISO 800 in dimmer conditions.
  • Higher ISO Settings (1600 and above): Perfect for low-light situations, such as indoors or nighttime photography. While ISO 1600 can help you capture images without a flash, be prepared for more noticeable grain. ISO 3200 can be used for very low light, but expect significant grain in the final image.

Modern digital cameras handle higher ISO settings much better than older film cameras did, significantly reducing noise even at higher values. The key takeaway is to experiment with different ISO settings to see how they affect your shots. Don’t hesitate to adjust your ISO based on the lighting conditions—higher sensitivity can make a big difference in capturing those special moments.

Shutter Speed

Shutter speed determines how long the sensor (or film) is exposed to light. A fast shutter speed—like 1/500th or 1/2000th of a second—will freeze motion, but it lets in less light, so you may need to increase your ISO to compensate. Slower shutter speeds (1/60th of a second or lower) let in more light but can cause motion blur or camera shake. If you’re handholding the camera, try to stay above 1/60th of a second. If you’re using a longer lens, say 85mm, you may want to use 1/100th of a second or faster to avoid shake.

For stability with slower shutter speeds, a tripod is your friend. Just bear in mind that vintage cameras often have lower maximum shutter speeds, but those quirks deserve their own chapter.


Aperture and depth of field

Aperture controls how wide the lens opens to let light in, and it’s measured in f-stops. A smaller f-stop number (like f/2.0) means a wider aperture, which lets in more light and creates a shallower depth of field—ideal for those portraits with a soft, blurry background. A higher f-stop (like f/16) means a smaller aperture, which lets in less light but keeps more of the scene in focus—perfect for landscapes.

Aperture not only affects the amount of light coming through but also how much of your image appears sharp. The trick is finding the right balance for the look you’re aiming to achieve.

Conclusion

One of the great things about digital cameras is that you can experiment with these settings without worrying about the cost of film. You can see the results immediately and make adjustments on the fly. Most digital cameras offer different modes to help you control the exposure. For example, “Shutter Priority” lets you set the shutter speed while the camera adjusts the other settings. “Aperture Priority” does the same for aperture. If you’re more experienced, you can take full control with manual mode.

This is just the first in a series of articles designed for beginners, but it’s always helpful for even the more seasoned among us to revisit the fundamentals. If you have questions, feel free to leave a comment. No question is too simple, and I’ll do my best to respond.

Until next time, Dear Reader.

Post Scriptum

I’ve noticed many of you arrive at this site through this page (probably from Google), so welcome! This is just the first in a broader series on photography. If you found this article helpful, there’s more where this came from. I also cover topics like composition, gear choices such as the Pentax ME Super, which as its name suggests is rather Super, the differences between 35mm and medium format, and my approach to street photography.

My aim is to demystify photography. It doesn’t have to be complicated. Whether you’re just starting out or already have some experience, I hope you’ll find something useful here. Thanks for reading, and don’t hesitate to ask questions or leave a comment. I look forward to hearing from you.