Get the basics and the basics will get you
Hello Dear Reader,
I have decided to follow somebody’s advice and write a series of articles purely about photography. You have already seen how photography has changed my life, and maybe you want it to change yours. This is not a course, and any advice given here is from my own perspective. My goal is just to provide a useful point of reference for you. It is what has helped me to become the photographer that I am today. Or at least the guy with a camera that writes all this stuff for you to read and consume. I will work on the assumption that you a complete neophyte and know nothing about photography and cameras, old and modern, and that you wish to use a “real” camera rather than your phone to capture the world around you. Does that sound fair?
I have had people come up to me and ask, so Ian, what this photography lark all about then? I want to produce images like you, can you tell me how to go about it? And now I feel my imposter syndrome kicking into overdrive!
Well, Dear Reader, you will have to acquire a camera! I know it sounds daunting, and if you look at the prices of a Leica, you might well keel over from a heart attack. Now, I’m not bashing Leica, since they are a manufacturer that make beautiful and rather sexy cameras, but they do cost a bit. You might not want to have to sell a kidney just yet. Save that for when you want to try film photography…
I would say any camera within your budget is a good start. I would also say that anything that allows you to control everything manually is an even better start. Go film or digital. Either will do, and any advice I might dare to put out there will apply to both formats. Just ask yourself do I want to appear to be a hipster and go Canon AE1, with rolls of film, do I want to be trendy and go with the Fuji Film X100F, or do I want the statement piece DSLR? I honestly don’t care. The camera is merely the tool that will allow you to capture those images that you’re dreaming about. I have written a couple of camera reviews so you can check those out, and I will be writing more in the future, so you will have a better idea for choosing. If you are interested in more camera reviews I can see what can be done, but I would only review cameras that I am familiar with and that I use, or have used.
Exposure
I’m going to go with decent exposure here, because indecent exposure will get you into trouble. Photography is all about light, and how the light will affect and react with the film or sensor in your camera. Too much light and your photograph will be “over exposed” and therefore too bright. Too little light, and your photograph will be “under exposed” and therefore too dark. You can however, use this under or over exposure to highlight various parts of the scene you are photographing. People talk about exposing for the highlights or shadows…
How do I control the light hitting my film or sensor?
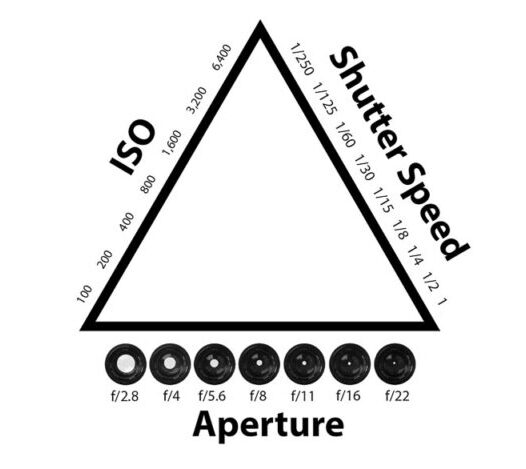
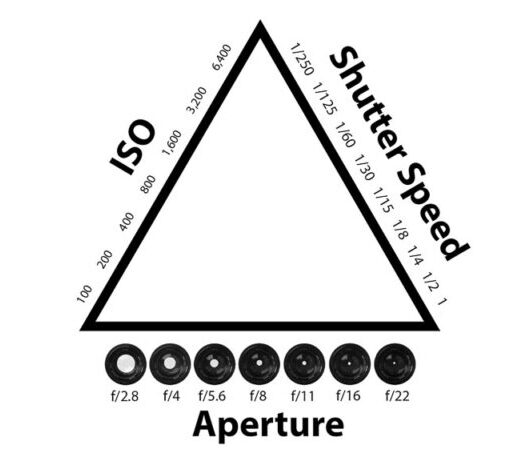
Everything is about balance, and balancing out the element in the exposure triangle. Changing one element will have an effect on the other two elements. This is shown in the famous exposure triangle below.

ISO or film sensitivity
The elements in my control are the sensitivity of my film or the ISO dial on my digital camera. The higher the number, the higher the sensitivity. With film, you will generally have the choice from anything from 100 ASA to 3200 ASA (ASA is exactly the same thing as ISO, but is used mostly for film). Exposing at ISO 100 or using I00 ASA film will give less grain (or noise for digital) but requires lots of light. Using ISO 400, or 400 ASA film allows you take photos on a cloudy day but will give you visible grain. Exposing at ISO 1600 or pushing film to 1600 will allow you to shoot indoors, but will give even more grain, and exposing at 3200 using 3200 film will give you the most grain but allow night-time photography. However, digital cameras will manage higher ISO setting with less grain (or visual noise) than on film.
Shutter Speed
Element number 2 is for how long I let the light hit the film or camera sensor. The longer I leave my shutter open, the more light will hit the film or camera sensor. If I use the highest shutter speed available (1/500th of a second to 1/2000th of second I will be able freeze motion, but that means that less light is hitting my film, or camera sensor. I will therefore have to use a higher ISO number and risk having more grain than I might want. I could use a longer shutter speed but if I go too low then I might capture camera shake. I can get around this by using a tripod, but that means I have to carry one around. The rule of thumb that I use is nothing under 1/60th of a second without a tripod, and like to aim for a middle ground 1/250th of a second. And the other “rule” is to us nothing less than the focal length of your lens. IE if I am shooting on a 50mm lens I will not shoot under 1/60th of a second. If I shoot with a 85mm lens, then nothing under 1/100th of a second etc. This will avoid camera shake. My older film cameras can’t shoot above 1/500th of a second and some top out at 1/250th of a second. But vintage cameras are a diferent ball game and deserve their own chapter.
Aperture
I can change the size of the hole (aperture) through which the light passes. The larger the hole, the more light goes through and the smaller the hole, the less amount of light goes through the hole. No wonder we talk about film sensitivity when it’s constantly being hit by light. The aperture is measured in F Stops, and you might people talking about stopping down, or using wider apertures. The aperture also controls depth of field. Strangely, the smaller the number F-stop, e.g. F2.0 le larger the aperture, and this will give you more “depth of field” and get that creamy bokeh that has always been so popular. The larger the F-stop number, e.g. F16 the smaller the aperture (or hole) will be, but this allows more of the frame to be in focus.
Conclusion
With a digital camera, you will feel more at liberty to “play around” with these settings and see how they affect your shots, instead of worrying about the cost of film and how much each individual photo is costing you. Depending on which camera you have, you have models that will do “Shutter priority” where you set the shutter speed and the camera does the rest for you, like the classic Canon AE1. Others that will be “Aperture priority”, where, as the name suggests, you choose the aperture, and the camera does the rest for you, like the Pentax ME Super, and others will be fully manual so you get to control everything. However on most, if not all digital cameras you will have all these choices included.
This is the first in a series of “how-to” articles that might be of use to beginner photographers, but it’s good to remind even old-timers like myself of the basics. Whatever you think, don’t forget to comment and like, and if you have any questions then ask them. There are no stupid questions, and every question deserves a response.
Until we meet again Dear Reader!


One thought on “Photography 101: Mastering the Fundamentals”