Manual Mastery – a beginner’s guide Part I


How many times have I seen grown men go to pieces at the suggestion of using manual mode?  Or worse, how many times have I seen other grown men saying that to be a real photographer you have to master manual mode otherwise you’re not a real photographer?  Let me assure you that it’s not as complicated as it sounds.  When I took my first  photography lessons in 1984, I learnt it as a child.  You’ve got this, and I’m here to accompany you through the process.   As the Hitchkiker’s Guide so elegantly says, in comforting letters, “Don’t Panic!”

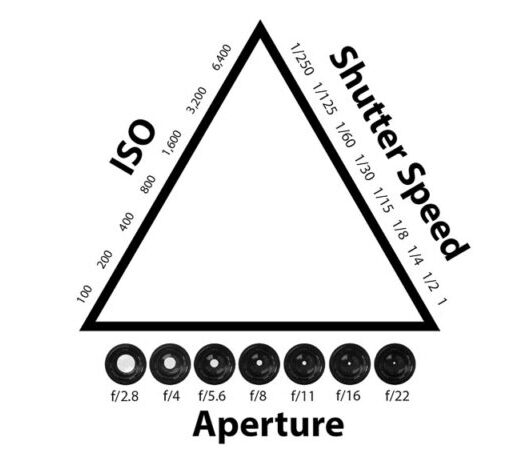
There are some basic concepts to understand, the first of which is the exposure triangle which we were introduced to in the Photography 101 article.  Those three things to consider are, ISO, or film sensitivity, shutter speed, aperture, and balancing them together.

Are you ready?  We’ll go step by step telling you how each of these settings influence your shot, and how we will balance them to create the image that “you” want instead of the image that your “camera” wants to take.  You are the creative boss after all.  And that is the reason that people use Manual Mode.

ISO, or film sensitivity

When I started learning photography in the last century was I was a young boy, yes I was young once, we only had film as a means to capture our images.  You would choose your film in function of the light available.  And when using my film cameras I still work in this way.  100 ASA (which is the same as ISO on modern camera) for sunny conditions, sometimes even 50 ASA, where the film can be used in bright conditions, going through to 200 ASA when it’s cloudy, but with sun shining through, to 400 ASA when overcast, 800 ASA when inside or even 1600 ASA, to 3200 ASA for night photography.  

In the film days we would talk about the presence or absence of grain and this was part of the deal.  You would get less grain the lower down the ASA range you went, and more grain the further up you went.  And this grain was a result of the crystals on the film emulsion, and the chemical developing process.  The choice could be as much about lighting conditions as an artistic decision.  Once the film you chose was in the camera however, it didn’t change until you changed your film.

Nowadays with all this modern technology palaver, you can change this ISO (because it’s digital photography) and change it for each photo.  Unfortunately the higher up you go in these values, the more “noise” you will get.  This digital noise is in a random pattern and totally unlike the grain of film photography.

Shutter speed

Shutter speed, as the words suggest, is about the speed of which the shutter opens  and closes to expose either the film or camera’s sensor.  You see, I told you that this would be simple to understand.  If I can get it, then so can you.  So now we’re on to speed.  When changing the speed of which the light hits the film or the shutter, I can freeze motion, of get a conscious motion blur, where the photo will seem animated.

Let’s say I want to take a photo of somebody running towards me. I will use a higher shutter speed to freeze the action.  Think of sports photography, of catching a  pass of a ball in rugby, or a footballer stopping a ball etc.  Those factors will make or break your image.  Imagine a photo of a football match and you can’t see the ball because it’s going faster than your shutter.  It might not work out for you.  In this situation, on my film cameras I will let the shutter curtain open for just 1/1000th of a second.  Depending on which digital camera I can go as quick as 1/8000 th of a second.

Let’s go to the other extreme.  I’m taking photos of a landscape and I want to show the motion of trees in the wind, the movement of the clouds, or the movement of water. I will use a longer shutter speed, say anything from 1/8th of a second to one second…  The subject will be moving faster than the shutter curtain, and I will get that artistic blur. 

I could be somewhere very dark, so in order to get a clear photo, I will have to let more light through onto my film or sensor.There I might have to use bulb mode in order to leave the shutter curtain for longer than 2 seconds.

For shooting a subject walking I would use 1/125th to 1/250th of a second to freeze the frame.  When using a flash in manual mode, I would aim to be around 1/60th of a second (which depends on your camera’s flash sync value).  When talking about shutter speeds I’m thinking of my film cameras  and bearing in mind that most digital cameras will have wider ranges of shutter speed.  Another tip for you would be to not let your shutter speed go below the number of your focal length (the legendary reciprocal rule).  Let’s say I’m using a 50mm lens, then I would not use a speed under 1/50th of a second, or even 1/60th of a second.  If I have a 200mm lens I would not go under 1/200th of a second. This is to counterbalance the weight of the lens and avoid lens shake.

Conclusion

This article has a lot of information in it and I have decided to separate everything and have a Part II.  In this Part I we have talked about sensitivity to light be that film, and the different ratings of films for various lighting situations.  In digital photography we have a wider range of ISO settings and with the newer cameras, the noise in an ISO 3200 setting will produce a much less grainy image than with film.  However this “grain” can be used as an artistic choice and I will let “you” experiment and see what each film gives you.

We have talked about shutter speed, and the ability to freeze an instant with a higher speed.  And the opposite of this to create motion in our image.

Next week we will talk about Aperture and how this effects depth of field and discover the rich creaminess of bokeh.  We will also explore various scenarii and give concrete examples of the effects of this triangle and how to turn it into an advantage.

The X100F, again!


It seems that I’m not the only one who raves about this powerhouse of a camera. This just proves that size truly doesn’t matter. I’ve mentioned it on numerous occasions and I stand completely justified in doing so!

Here’s a selection of articles that I have written showcasing phtoography from this amazing little camera in no particular order:

The idea behind using a camera is not just about capturing moments, it’s also about the experience it grants you. This camera has the ability to inspire and motivate its users to explore and create, which is a testament to its design and functionality. The joy and enthusiasm that comes with using this camera is contagious, and it’s evident in the way it empowers photographers to unleash their creativity. It’s not just a tool, but a companion that fuels the passion for photography, encouraging individuals to embrace the world around them through its lens.

Photography 101: Mastering the Fundamentals


Why Photography?

Hello, Dear Reader,

I’ve decided to take some advice and start a series of articles focused purely on photography. You may already know how photography has impacted my life, and perhaps you’re hoping to discover something similar for yourself. This isn’t a formal course, and the advice I share comes from my own experiences over the years. My aim here is to offer you a useful reference point as you begin or continue your own photographic journey.

Let’s assume you’re new to photography and want to move beyond using your phone’s camera. You’re ready for a “real” camera. Does that sound about right?

From time to time, people approach me and say, “Ian, what’s the deal with photography? How do I get photos like yours?” That’s when my imposter syndrome likes to make an appearance. But despite that, I’m here to share what I know.

To begin, you’ll need a camera. I know it can feel overwhelming, especially if you’ve glanced at the price of a Leica and wondered if it’s worth selling a kidney. (Pro tip: hold off on that.) Leicas are beautiful, but you don’t need to break the bank to get started.

Any camera within your budget is a good starting point, especially if it allows you to control settings manually. Whether you choose film or digital, the fundamentals remain the same. Do you want the retro charm of a Canon AE1, the compact style of a Fujifilm X100F, or perhaps a more professional DSLR? The choice is yours, but remember: the camera is just a tool. It’s how you use it that matters. I’ve written some camera reviews you can check out, and I plan to add more in the future.

Now, let’s talk about the basics.

Exposure Basics

Photography is essentially about light—how much of it reaches your camera’s sensor (or film) and how it interacts with your subject. Too much light, and your image will be “overexposed” (too bright). Too little light, and it will be “underexposed” (too dark). You can, of course, play with these elements intentionally, using over- or underexposure to highlight specific areas of your shot. Photographers often talk about exposing for the highlights or shadows to get the right balance. In film photography we will expose for the shadows and in digital photography we expose for the highlights.

How do I control the light?

It all comes down to balancing three key elements, often called the “Exposure Triangle”: ISO, shutter speed, and aperture. Adjust one, and you’ll need to compensate with the others. Let’s go through each of these in turn.

Exposure triangle, showing the effects of aperture, shutter speed and ISO

Understanding ISO

ISO controls your camera’s sensitivity to light, crucial for getting the right exposure in your photographs. In film photography, it’s referred to as ASA, but the principle remains the same.

  • Lower ISO Settings (100-400): Ideal for bright conditions, such as sunny days, as they produce images with minimal grain or “noise.” For example, using ISO 100 outdoors on a clear day will give you crisp, clear shots.
  • Moderate ISO Settings (400-800): These settings are suitable for cloudy days or indoor lighting. Using ISO 400 allows you to capture good quality images without excessive grain, but expect some visibility of noise when using ISO 800 in dimmer conditions.
  • Higher ISO Settings (1600 and above): Perfect for low-light situations, such as indoors or nighttime photography. While ISO 1600 can help you capture images without a flash, be prepared for more noticeable grain. ISO 3200 can be used for very low light, but expect significant grain in the final image.

Modern digital cameras handle higher ISO settings much better than older film cameras did, significantly reducing noise even at higher values. The key takeaway is to experiment with different ISO settings to see how they affect your shots. Don’t hesitate to adjust your ISO based on the lighting conditions—higher sensitivity can make a big difference in capturing those special moments.

Shutter Speed

Shutter speed determines how long the sensor (or film) is exposed to light. A fast shutter speed—like 1/500th or 1/2000th of a second—will freeze motion, but it lets in less light, so you may need to increase your ISO to compensate. Slower shutter speeds (1/60th of a second or lower) let in more light but can cause motion blur or camera shake. If you’re handholding the camera, try to stay above 1/60th of a second. If you’re using a longer lens, say 85mm, you may want to use 1/100th of a second or faster to avoid shake.

For stability with slower shutter speeds, a tripod is your friend. Just bear in mind that vintage cameras often have lower maximum shutter speeds, but those quirks deserve their own chapter.


Aperture and depth of field

Aperture controls how wide the lens opens to let light in, and it’s measured in f-stops. A smaller f-stop number (like f/2.0) means a wider aperture, which lets in more light and creates a shallower depth of field—ideal for those portraits with a soft, blurry background. A higher f-stop (like f/16) means a smaller aperture, which lets in less light but keeps more of the scene in focus—perfect for landscapes.

Aperture not only affects the amount of light coming through but also how much of your image appears sharp. The trick is finding the right balance for the look you’re aiming to achieve.

Conclusion

One of the great things about digital cameras is that you can experiment with these settings without worrying about the cost of film. You can see the results immediately and make adjustments on the fly. Most digital cameras offer different modes to help you control the exposure. For example, “Shutter Priority” lets you set the shutter speed while the camera adjusts the other settings. “Aperture Priority” does the same for aperture. If you’re more experienced, you can take full control with manual mode.

This is just the first in a series of articles designed for beginners, but it’s always helpful for even the more seasoned among us to revisit the fundamentals. If you have questions, feel free to leave a comment. No question is too simple, and I’ll do my best to respond.

Until next time, Dear Reader.

Post Scriptum

I’ve noticed many of you arrive at this site through this page (probably from Google), so welcome! This is just the first in a broader series on photography. If you found this article helpful, there’s more where this came from. I also cover topics like composition, gear choices such as the Pentax ME Super, which as its name suggests is rather Super, the differences between 35mm and medium format, and my approach to street photography.

My aim is to demystify photography. It doesn’t have to be complicated. Whether you’re just starting out or already have some experience, I hope you’ll find something useful here. Thanks for reading, and don’t hesitate to ask questions or leave a comment. I look forward to hearing from you.

Why the Pentax ME Super Is the Perfect First Film Camera (Even in 2025)


Dear Reader, if you’ve read my last post, you will understand my current state of photographic helplessness after my X100F was taken out of service. Before we proceed, I want to take a moment to reassure my dear mother that I’m doing fine, being a big brave boy during this challenging time, and not losing my mind. I’m still getting my photographic fix, and I thank you, Dear Reader, for your understanding.

Now, let’s dive into today’s topic. The Pentax ME Super, a camera gifted to me by a fellow musician and dear friend, Robert McMillan, holds a special place in my heart. Using it brings back fond memories, and I’m forever grateful for the thoughtful present.

Introduced in 1979, the Pentax ME Super is a 35mm SLR camera that offers reliability and ease of use, making it perfect for those seeking excellent image quality. However, it requires proper focus and composition to make the most of its capabilities. When I use it, I approach photography in a similar manner to how I would with my beloved X100F, albeit with a slight adjustment due to the 50mm lens, which changes from the 35mm lens on the Fuji.

Technical Specs:

  • Shutter speed range: 4 seconds to 1/2000 second, plus Bulb – allowing wide apertures and excellent depth of field.
  • ISO speed range: 12 to 1600
  • Exposure control: Aperture priority
  • Viewfinder: 0.9x magnification, 95% coverage
  • Other features: include a self-timer, a cable release socket, and exposure compensation.

Handling and Ergonomics:

The ME Super is a well-made and compact camera, making it easy to carry around; it is almost the same size and weight as the X100F. The controls are user-friendly and well-positioned. The large, bright viewfinder helps, especially for those of us with less-than-perfect vision.

While it may not surpass the joy I find in using the X100F, the ME Super is steadily gaining ground, and its satisfying shutter noise is a small comfort during this time of longing. Loading and unloading film is a breeze, and the shutter release is smooth and responsive. Additionally, the camera’s reliability is reassuring, offering solace in the absence of the X100F.

Image Quality:

The Pentax ME Super consistently delivers excellent image quality. Composing shots is a breeze with the sharp and bright viewfinder, and the aperture priority exposure control ensures proper exposure. For someone like me who cherishes depth of field, the 1/2000 of a second shutter speed is a delightful feature.

Moreover, the ME Super is compatible with a wide range of Pentax K-mount lenses, providing versatile options for image-making. With my collection of 24mm wide-angle, 50mm F1.7, and 24-80mm zoom lenses, I’m well-equipped for various shooting scenarios, and there is even a 15mm wide angle lens, but I nearly peed myself when I saw the price!

The Verdict:

In conclusion, the Pentax ME Super is an exceptional 35mm SLR camera. Its well-made design, ease of use, and ability to produce outstanding image quality make it an appealing choice. If you’re searching for a reliable and versatile camera that brings years of photographic enjoyment, the Pentax ME Super won’t disappoint.

Pros:

  • Excellent build quality
  • Sharp and bright viewfinder
  • Simple and straightforward operation
  • Wide range of compatible lenses
  • Capable of producing excellent image quality
  • Built-in exposure compensation
  • Self-timer
  • Cable release socket

Cons:

  • Flash sync limitations at faster shutter speeds (i.e., more than 1/125)
  • Not an X100F

Overall:

The Pentax ME Super is an excellent 35mm SLR camera, offering great build quality, ease of use, and superb image quality. It’s a dependable choice for any photography enthusiast seeking a delightful film shooting experience.

Additional Information:

The ME Super remains popular among collectors for its exceptional build and image quality. If you’re interested in acquiring one, you can explore used cameras online or at camera shops. Additionally, you’ll find manuals and other valuable information about the camera on the internet.

I hope this review proves helpful. If you have any questions, please feel free to ask in the comment section.

But, most importantly, let me stop talking and allow you to enjoy some photos taken with the Pentax ME Super, capturing moments in Clisson and Nantes.

Post Scriptum

If the Pentax ME Super has caught your attention, I’d recommend checking out my other posts on classic film cameras like the Olympus Pen EE S (Aug 9, 2023) or my reflections on the lasting appeal of film photography in In Defense of Film (Aug 23, 2023). For a more in-depth look at the Pentax in action, mark your calendars for Capturing the Essence of Nantes: A Street Photography Journey with the Pentax ME Super and Kentmere 100 Film (coming Nov 17, 2023). And for those curious about the Fujifilm X100F, you can preview how it compares in Seeing the World Through 35mm: Street Photography with the Fujifilm X100F (Jun 21, 2023). A more detailed comparison between these two cameras is also coming this November!