I want it, but do I really need it?


The camera gear industry is a powerful beast and it tries to convince us that this piece of kit, that is conveniently in stock, will help you become that photographer that you are destined to be.  Be that in magazines, be that in youtube influencer videos that “try out the camera” that the manufacturer has just lent us to show you what it’s like.  I’ve watched loads of these videos especially when thinking about the kit I wanted to buy.  Come on in and I’ll make sure you have the best camera possible, and the best possible lens.  What’s your budget?  OK, I’m sure we can work something out.  What kind of photography do you want to do?  Well, you’ll need this, and this, and this, etc.

That nice man in the shop will be more than happy to take your money and sell a high end camera that will be a thing of beauty.  But look at the title again.  “I want it, but do I really need it?”  You have fallen into their trap.  I’m not trying to put down these sales people, and their wealth of knowledge, but know that there are other options out there.

I’m going to dare say it.  You don’t need the latest and greatest equipment to take great photos.  Instead prioritise value, and mindful shooting, over gear acquisition.  Think about boys and toys.  I get exactly the same feeling as you when I enter a camera store.  I want it all.  Of course I do.  Who doesn’t?  But,what would my wife say?  What would my bank manager say?  What would reason tell me instead of letting my emotions get the better of me?  Can I really justify this acquisition?  Do I really need it, or is there a less onerous solution?  I know.  I’ve just pissed on your bonfire, but it’s time for a reality check here…

So what can I do about that?  You can realise that there is a huge market of second hand gear out there.  I have taken this route in the past and have no regrets.  Yes, I did it my way…

Where do you go to discover all these hidden gems?  There is of course E-Bay, that huge online auction site which I used to acquire the majority of my film cameras.  When I was a customer of the site the film cameras were fairly cheap, since those pesky hipsters hadn’t cottoned on to the fact that film photography is cool.  So yes, each purchase was a gamble, but I had less money to lose, and the return would be greater.  The old cameras were simpler, the lenses were great, and there are still lots of examples of reasonable cameras out there.  Would I use it for digital?  Probably not.  I’m not really a gambling man, and don’t have a huge wad of cash that I am willing to possibly waste.

But E-Bay is not the only option.  There are various online sites such as mpb.com that have a very good reputation, and have tested each piece of equipment that they sell.  They give you an honest appraisal of the piece of kit and are honest about the state of said piece of kit.  They guarantee each purchase, and have a generous returns policy.  I might consider using it if I were interested in buying some new kit.  But at the moment I’m not.  There are also second hand areas of our beloved camera shops that will have used gear.  

When buying second hand, you will generally be spending less money, or at worst, getting more kit for your hard earned cash.  Older models of camera might not be as super duper as the latest models that look so sexy in that shop window, but for what most us mere mortals need, they are more than adequate.   You really have to look at which features are most important to you.  Thanks to you, there will be one less camera going to landfill.

Talking of features, let’s talk about the 80/20 rule.  For 80% of your photographs, you will use about 20% of your gear, and features on your camera. I urge you to identify the essential features for your type of photography (e.g., autofocus, image stabilisation, dynamic range), and maybe avoid spending money on features or lenses that you won’t use frequently.  Shutter speed when doing sports photography, or high dynamic range for landscape photography.  Is an F1.2 lens really what you need, or will F2.0 pr F2.8 still get the effect you want?

I’m going to talk about the X100F (again!) and compare it to the latest version from Fujifilm, the X100V and the X100VI

FeatureFujifilm X100FFujifilm X100VFujifilm X100VI
Sensor24.3MP APS-C X-Trans CMOS III26.1MP APS-C X-Trans CMOS 440.2MP APS-C X-Trans CMOS 5 HR Sensor
Lens23mm f/2 (35mm equivalent)23mm f/2 (35mm equivalent) with improved optics23mm f/2 (35mm equivalent) with further improved optics
Autofocus91-point hybrid autofocus425-point hybrid autofocus with improved face/eye detection425-point hybrid autofocus with further improved face/eye detection and subject tracking
ViewfinderHybrid viewfinder (optical/electronic)Hybrid viewfinder (optical/electronic) with improved EVFHybrid viewfinder (optical/electronic) with a larger and higher resolution EVF
Screen3-inch fixed LCD3-inch tilting touchscreen3-inch tilting touchscreen
Image StabilisationN/AN/A6-Stop In-Body Image Stabilization
Video1080p up to 60fps4K up to 30fps6.2K (cropped) and 4K up to 30fps
Weather SealingNoYesYes
Price (approx.)€800-€1000 (used)€1300-€1500 (used)€1700-€1800 (new)

Key Takeaways:

  • Sensor: The X100VI offers a significant resolution upgrade with its 40.2MP sensor, providing greater detail and flexibility for cropping compared to the X100V and X100F.
  • Lens: All three models share the same focal length, but the X100V and X100VI feature improved lens designs for better sharpness and close-focus performance.
  • Autofocus: The X100V and X100VI offer a substantial upgrade in autofocus points and performance compared to the X100F, making them better suited for fast-moving subjects and low-light situations.
  • Viewfinder: The X100VI has the most advanced viewfinder with a larger, higher resolution electronic viewfinder (EVF) and improved refresh rate.
  • Screen: The X100V and X100VI have tilting touchscreens, which can be helpful for composing shots from awkward angles, while the X100F has a fixed screen.
  • Video: The X100VI boasts the most advanced video capabilities, offering 6.2K recording with a crop, while the X100V is limited to 4K, and the X100F to 1080p.
  • Weather Sealing: Both the X100V and X100VI offer weather sealing, making them more durable in adverse conditions compared to the X100F.
  • Price: The X100F remains the most affordable option, especially on the secondhand market. The X100V offers a good balance of features and price, while the X100VI is the most expensive but comes with the latest technology.

Ultimately, the choice depends on your budget, needs, and priorities. If you need the highest resolution and advanced video features, the X100VI is the way to go. If you prioritize value and portability, the X100F is still a great option. The X100V sits in the middle, offering a good balance of features and price.

If you are a professional, then I think the same logic will apply.  Even though a nice kit is an investment you need to consider the returns on your investment?  Is the purchase justified and will it bring more work for you?  Will it expand my offer enough?  If you are an amateur, then you can spend any amount of money you want, but if you could do more, with less, wouldn’t that be an appealing option? Have I not managed to convince you yet? Look at the film archives… And look at the pictures from the X100F

Optimizing Images On-the-Go: Mobile Photography Editing Guide


Introduction

As the title suggests, I will describe my workflow when out and about. While there are surely other ways to do it, this is my method. It works and has stood the test of time. I usually wander around taking photos, then find a café to sit down and transfer my images to my phone. Everything is better with a nice cup of tea (or coffee) and a piece of cake.

Downloading Photos to Your Phone

Most cameras today can connect to phones via Bluetooth or Wi-Fi. My two Fujis (X100F and XT2) and my Canon (6D Mark II) certainly can. I enable Wi-Fi on my camera and connect it directly to my phone. Next, I open the corresponding app—Canon Camera Connect for my Canon and Fujifilm Camera Remote for my Fujis. Each manufacturer provides its own app for Android or Apple devices. Once the camera is connected to my phone, I can import my photographs, selecting the images I prefer.

Sorting Photos

Now comes the fun bit: sorting through all those wonderful shots you took and deciding which ones are worth working on and editing. When I transfer my images from my camera to my phone, the phone creates a folder for the imported photos. Different apps will put them in different places, so I’ll leave that to you to manage. As a rule of thumb, you will see them in the gallery app, which will show you your latest photos.

In the gallery app, you can sort your photos by date taken, favourite images, or the place where the photo was taken.

I will assume you have read my last few articles on Photography 101, composition, and the types of lenses available and how to use them, or at least how I use them. If you haven’t had that pleasure, then go and have a read…

Is the photo worthy of publication, and are you happy with it representing your talent as a photographer? Is the image in focus? Is the image well exposed? Does it fulfil its storytelling role? Will it add to your narrative? Or simply, do you like it enough to want to share it?

Let’s assume that you answered yes. You then get to share your image to Snapseed.

Editing in Snapseed

Starting with Styles:

I like to begin by using the “Portrait” style. It is a preset that gives the photo a subtle glow and some vignette. I just seem to like it, and when you have something you like that flatters your image, you are tempted to stick with it. Most times, this will work a treat on well-exposed images. But let’s imagine that you have exposed for the highlights and that your shadows are “too dark” and you want to bring them up a bit. Then I would go to the “Tools” section and use the Tune Image.

En aparté:

When exposing in digital photography, we expose for the highlights, as it is easy to lighten, or “bring up” the shadows, and we don’t want to “blow out” our highlights and just turn it into a mass of white. In film photography, it’s the opposite. We expose for the shadows, as film has more difficulties capturing details in the shadows especially in a photo with lots of light.

Using the Tools

As I inferred in the title, this is my workflow, and shows the way I use Snapseed. There’s a whole load of tools to stylise your image and to completely change the look of it, but I’m more of a “less is more” disciple when editing. Also most apps out there will have similar tools, so you can carry this knowledge with you across the board.

Crop Tool:

One thing I learnt early one is to KISS, i.e. Keep it simple stupid. Sometimes I will have an element in my photo that distracts from my subject. With the crop tool I can just crop the image and make it disappear. I can also use the crop tool to format the image to fit certain social media post settings. I’m thinking about you Instagram and Facebook. Try searching google for social medi formats and you will be inundated with results.

Healing Tool:

Sometimes the crop isn’t enough to take away distracting elements from our photo. You might have a beautiful shy and want to get rid of that Jumbo Jet in the sky. One way of doing that is to wait until the Jumbo Jet has flown away, but let’s say that it’s too late… Using the healing tool will clone part of the image and replace the Jumbo Jet that just wants to noticed and validated man! To get the best results it’s better to zoom into the image and have a smaller area to work on.

Tune Image:

This is where I do the basic edits, bringing up the shadows or bringing down the highlights. I usually keep it to that. At a push, I will bring up the brightness if the photo has been underexposed. Somtimes I will add a little contrast but I tend not to use the other tools. I don’t want to denautre the photograph.

Rotate Tool:

We should always try and keep our horizons straight, except when making the conscious decision not to. The rotation tool tries to straighten what it thinks should be straight. It generally works quite well, but you do have total control as well as a grid to check the lines in your photo.

Brush Tool:

This is where we can do our burning and dodging. You can choose to highlight a certain area and darken others to emphasise your subject. This brings the photo to life. There are tutorials galore on YouTube that go into more detail than I will in this “basics” article.

Black and White Tool:

Welcome to the world of black and white conversion. It’s a process that a majority of my photography goes through. You can, of course, just use the saturation tool in the “Tune Image” section, and you will get a monochrome image. But you can do so much more.

So, let’s do so much more. The black and white tool offers you some presets which might correspond to your taste. I tend to leave them alone and instead press on the circle that will give a series of colour filters to choose from. This is a direct link back to black and white film photography, and you know how much I love that. I love using the red filter, which, as in film photography, will make your blues darker. This is beautiful for those landscape photos where you want a dark sky to complement those fluffy white clouds.  It’s also my default film simulation on the X100F that I use for all my street photography.  It’s just a look that I fell in love with years ago.
The other common filters are all covered too.

  • Orange:  Orange filters give stronger effects than  yellow filters but are not as bold and dramatic as a red. It is therefore an ideal choice to span the effects given by both these filters.  Blue skies will be recorded in very dark tones on the print, giving bold contrast between the sky and clouds. An orange filter will also penetrate haze and fog. Most flowers will be recorded with a significant difference in tone from the surrounding foliage giving impact and effect.
  • Yellow, the general purpose black and white filter,
  • Green:  When photographing foliage in black and white, a green filter is used almost exclusively.  It lightens green foliage, which is particularly important with dark green leaves which can record very dark without a filter. It therefore gives a more natural, lighter feel to the photograph.
  • Blue: A blue filter is not often associated with black & white photography however, it can really add “mood” to a photograph by increasing the effect of haze or fog.  It also lightens blues and darkens yellows, oranges and reds which helps separation in scenes containing a mix of colours.

Export

You have two options.  You can either press on “done” and Snapseed will record your image in the Snapseed folder and in your gallery in the Album neamed Snapseed, or you you can press “share “and you will be presented with various options on how to share your image, to Instagram, via gmail etc.

Before you do that you can press on settings where you can change the resolution of the image that will be exported.  This can help if you need to reduce the image to take up less space on your phone, or if you’re loading the photo up to a website and you require a “lighter” image.

Conclusion

You now have an idea about how I edit my images on the go, and the more time goes on, the more I do it this way.  Is it the same as Lightroom on my computer?  No.  I can’t have as much control as in Lightroom. I can’t batch edit, I can’t do this or that, but I can manage without, especially on the go.  There are of course other options for photo editing on the go like Lightroom mobile,VSCO, your native photo editor app on your phone.  As I said at the beginning of the article this is how “I” do things.  It works for me.  Try it out and it might just work for you too!

Photo Editing On The Go With Snapseed


INTRODUCTION

Twenty-two years ago, I was fired from the job that took me away from Paris to the French countryside where I now live. In hindsight, it was one of the best things that ever happened to me. Sometimes we need that shove beyond our control to nudge us in a different direction.

At the time, I was already into this new thing called the internet that was becoming more and more mainstream. I wanted to learn all I could before my children would teach me. So, I learnt. I even trained to be an “infographiste,” which is similar to a webmaster, now known as a web developer.

AN ENGLISHMAN IN VENDÉE

I learned how to use QuarkXpress, Indesign, Dreamweaver, Photoshop, and Illustrator. I also learned how not to be afraid of opening up a computer and getting in there with a screwdriver. I had this amazing idea of creating a website called “An Englishman in Vendée” to showcase outings with my young son around the area. I took photos with a “webcam” which was about the size of a GoPro but compared to what we have twenty years on, was anything but pro. At the time, I dreamt of having portable internet, portable editing software, and a means of sharing those pictures online.

I would have to wait a while. In 2024, I have a Samsung S20 FE and I now have all I need to do that, on the go! I can even transfer the photos from my high-end digital camera to my phone, edit the images on my phone, and publish them either on my website (no longer Geocities) or on social media.

WELCOME TO SNAPSEED

Now I use “Snapseed” for editing my photos, WordPress for writing my articles, and Chat GPT to give my articles structure and a writing plan. All this in a device that fits into my pocket.

So, what is Snapseed? It’s an app that I recommend to anyone who needs to edit pictures on the go. It is available for Android and Apple devices, so you’re all covered. But why Snapseed? Well, it’s free, simple to use, and has all the tools you need for editing. It’s intuitive and comprehensive. I particularly like the Tune Image section, where I find all the tools I use for basic edits in Lightroom on my PC. The Rotate tool helps me check horizons, and the Black and White tool gives me full control over the conversion process.

Snapseed is a non-destructive editing programme (app) that uses your original file, whether RAW or JPEG, and allows you to edit to your heart’s content. Can it do everything Lightroom can? No. Is it trying to? Still no. It adds some nice “style filters” in the tool section that allow you to have fun. The more serious photo editor will probably stick to the basic tools that still allow them to get the results they need “on the go.” I use it during shoots to give sitters an idea of what their shots will look like. These first “draft” images are perfect for sharing on social media.

KEEP IT SIMPLE WITH SNAPSEED

I’ve talked about KISS in the past, and I’m going to mention it today too. KISS – Keep it Simple Stupid! Snapseed is deceivingly simple when you look at the user interface, but it has a range of tools that help you achieve the look you want.

It starts by offering you three basic options: Styles (similar to presets), Tools (where you can fine-tune everything), and Export (where you go to export your edited photo).

STYLES

Styles are essentially presets in other software, and Snapseed offers a variety of styles:

In the next article, we’ll talk about the various tools Snapseed offers to help you edit on the go. I will walk you through my basic editing process, showing you which tools I use and how I use them. Remember the 80/20 rule: 80% of your editing can be done with 20% of the available tools. So be patient, and you will be rewarded for your patience. See you in the next one!

Zooming In on Flexibility Part I


We’ve talked about prime lenses and the difference between primes and zooms.  But we haven’t touched on zooms.  Yet.  But we’re about to enter the dark side.  They have cookies.  So now that we’ve had a cookie, let’s talk about having our cake and eating it.  Metaphorically speaking of course.  

The ability to zoom in on a subject, be it in photography or in conversation has become such an ubiquitous saying.  Zooming in on the details in a conversation.  The image evoked is fair though.  A zoom lens allows us to zoom in visually. 

I might even go as far as to describe them as a guilty pleasure.  That kind of thing that gets results but leaves you feeling a little dirty afterwards, and you feel like you have to justify why you couldn’t just use a purer prime.  Well sometimes you need the versatility of a zoom.  It means you have to take less kit to weigh you down.

This article started as a single piece of writing, and then going more in depth, it has morphed into a series of two articles.  I have a lot of information for you, and it might be easier to digest as a two part story.

The Zoom lens work flow

A zoom lens is more than an investment, it is akin to having four lenses in one support.  One going from 16mm, 24mm, 28mm to 35mm, another from 24mm, to 35mm, to 35mm, to 50mm, and onwards and upwards to 70mm.  Roughly translated you’re getting more glass for your buck, which sounds very enticing.

Advantages and disadvantages

 As in all photography, everything is a matter of balance though.  Ok, you may have more glass, but instead of creamy f1.8, f2.0 creamy bokeh, the trade off will be f4 bokeh, while still nice isn’t as creamy.  You might find f2. Bokeh but you’ll be paying many more bucks.  The difference in price between the Canon EF 16-35mm f/4 L IS USM and the Canon EF 16-35mm f/2.8 L IS USM is around 1000€ which doubles the price of your lens.  This basic economics speaks volumes to me.  

The different focal lengths in just one place allows you to adapt more quickly to a changing situation rather than “faffing” about changing multiple lenses multiple times.  Just one turn of the focal ring, and you’re good to go.  So you’re more available to contemplate a scene and not miss a thing.

They are generally larger than the more subtle nifty fifty, and the general public will take you for a “pro” and wonder why you are pointing a massive obtrusion towards their face.  Some zooms are of course less imposing than others, but you might have to explain more about what you are doing.  

The types of Zooms  

I have talked about the concept of a zoom lens as being a collection of different lenses in just one lens.  In the next article I will describe the example of each zoom I  use, but here I will do the introductions.  We don’t want to get ahead of ourselves.

For me, there are three types of zooms, the wide angle, the general, and the telephoto.  So three types of zoom tend towards three types of application.

The wide angle zoom offers you a wide angle of view, and its downfall of image distortion can be made the most important feature allowing you a means of getting creative in your images.   You can go from those beautiful vistas so beloved of landscape photographers, to those of us who seem to have an obsession with taking close-up photos of bicycles and helping the audience see the world in a more non-conventional or even exciting way.  

The general zoom, is as its name suggests a zoom that has you covered for general scenarii.  The focal lengths are the ones most commonly used.  It’s great in a street photography or documentary environment allowing you to easily glide between wider and narrower views.  Even though the aperture may not be as important as in primes, the image stabilisation helps the photographer when the light becomes more challenging. 

The telephoto zoom allows us to be closer to our subject whilst at the same time being a greater distance.  Useful not only for wildlife photography, but also for sports photography where the players are on the pitch and not the photographer!

Conclusion

Now we are on the same page and have a greater idea of what the whole situation is and how these solutions can help you as a photographer, be that a beginner, an intermediate, or a more advanced photog.  I talk about guilty pleasure, but when push comes to shove, the viewer of your photography doesn’t care.  They care about the image and how it makes them feel.  The fact that we used such and such a  lens is just speaking to them in a foreign language.  We’ve talked about the trade offs but also the benefits of zooms and in my next article I will talk about my set-ups and the experiences I have when shooting with these lenses..

Finding Balance: Photography and Personal Wellness


In the sanctuary of my thoughts, where the gentle glow of lamplight dances upon well-worn bookshelves, I find solace from the chaos of the world. With my dog, Molly, by my side, I embark on a journey of introspection.

As someone who values quiet reflection and nuanced understanding, I’ve learned to appreciate the delicate equilibrium that enriches a fulfilling life. Amidst the pursuit of knowledge and creative expression, it’s easy to become ensnared in the whirlwind of activity, neglecting personal well-being in the relentless chase for success.

Yet, amidst the simplicity of my surroundings, among the familiar scents of brewed tea and the soft hum of a jazz record playing in the background, I am reminded of a timeless truth: genuine fulfillment springs not from ceaseless striving, but from nurturing inner peace and harmony.

For photographers and thinkers alike, the quest for excellence can exact a toll on the spirit, leaving behind exhaustion and doubt. Each moment of creation demands both physical exertion and emotional resilience.

But amid life’s ebbs and flows, it’s crucial to honor the sanctity of body and mind, to heed the whispers of intuition and the call of the soul. What value is there in a well-crafted image or a finely wrought idea if born from weariness?

In my own journey as a seeker of beauty and understanding, I’ve come to embrace moments of stillness and contemplation, carving out time for rest and reflection amidst the bustle of daily life. Whether reveling in solitude or feeling the gentle caress of a cool breeze, I’ve discovered that inspiration often arises from quiet depths.

Photography serves as a therapeutic outlet for many, offering respite from the pressures of modern life. Through the lens, we enter a realm of infinite possibilities where time seems to slow and worries fade into the background. Immersed in the act of creation, we create a space where anxiety and overthinking lose their grip, replaced by a sense of calm and clarity.

For those grappling with depression or loneliness, photography can serve as a lifeline, gently coaxing us out of isolation and into the embrace of the world. As we wander with camera in hand, we become mere observers, detached from the chaos that threatens to overwhelm. In framing a shot, we find solace in the simple beauty of the moment, forging a connection with the world that soothes the soul and restores the spirit.

When I’m not at my desk, crafting articles or editing photos to share with you, I’m exploring this balance between creativity and self-care, constantly striving to find harmony in my own life.

In the tranquil sanctuary of creativity and self-discovery, photography emerges not only as a means of capturing fleeting moments but also as a powerful tool for nurturing personal wellness. Through our cameras, we embark on a journey of exploration and introspection, finding solace in the beauty of the world and sanctuary in the act of creation.

As we navigate the complexities of modern life, let us honor the delicate balance between ambition and well-being. Photography offers us a pathway to reconnect with ourselves and the world, inviting us to embrace stillness amidst the chaos and find beauty in the ordinary.

Whether framing the perfect shot or crafting prose to accompany our images, let us remember the profound interconnectedness between creativity and personal wellness. By prioritizing self-care and mindfulness in our photographic practices, we not only enhance our capacity for artistic expression but also cultivate a deeper sense of harmony and fulfillment in our lives. Even if our endeavors don’t always yield the desired result, it’s essential to recognize that the journey itself is as, if not more, important than the destination.

So, dear reader, as you embark on your own photographic journey, may you find solace in the act of creation, clarity in moments of quiet contemplation, and inspiration in the beauty that surrounds you. May your photographs serve not only as snapshots of the world but also as windows into the depths of your soul, guiding you towards a life of greater balance and well-being.

Photography 101: Mastering the Fundamentals


Why Photography?

Hello, Dear Reader,

I’ve decided to take some advice and start a series of articles focused purely on photography. You may already know how photography has impacted my life, and perhaps you’re hoping to discover something similar for yourself. This isn’t a formal course, and the advice I share comes from my own experiences over the years. My aim here is to offer you a useful reference point as you begin or continue your own photographic journey.

Let’s assume you’re new to photography and want to move beyond using your phone’s camera. You’re ready for a “real” camera. Does that sound about right?

From time to time, people approach me and say, “Ian, what’s the deal with photography? How do I get photos like yours?” That’s when my imposter syndrome likes to make an appearance. But despite that, I’m here to share what I know.

To begin, you’ll need a camera. I know it can feel overwhelming, especially if you’ve glanced at the price of a Leica and wondered if it’s worth selling a kidney. (Pro tip: hold off on that.) Leicas are beautiful, but you don’t need to break the bank to get started.

Any camera within your budget is a good starting point, especially if it allows you to control settings manually. Whether you choose film or digital, the fundamentals remain the same. Do you want the retro charm of a Canon AE1, the compact style of a Fujifilm X100F, or perhaps a more professional DSLR? The choice is yours, but remember: the camera is just a tool. It’s how you use it that matters. I’ve written some camera reviews you can check out, and I plan to add more in the future.

Now, let’s talk about the basics.

Exposure Basics

Photography is essentially about light—how much of it reaches your camera’s sensor (or film) and how it interacts with your subject. Too much light, and your image will be “overexposed” (too bright). Too little light, and it will be “underexposed” (too dark). You can, of course, play with these elements intentionally, using over- or underexposure to highlight specific areas of your shot. Photographers often talk about exposing for the highlights or shadows to get the right balance. In film photography we will expose for the shadows and in digital photography we expose for the highlights.

How do I control the light?

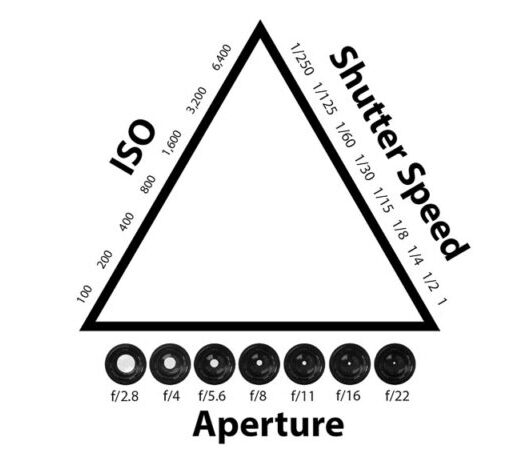
It all comes down to balancing three key elements, often called the “Exposure Triangle”: ISO, shutter speed, and aperture. Adjust one, and you’ll need to compensate with the others. Let’s go through each of these in turn.

Exposure triangle, showing the effects of aperture, shutter speed and ISO

Understanding ISO

ISO controls your camera’s sensitivity to light, crucial for getting the right exposure in your photographs. In film photography, it’s referred to as ASA, but the principle remains the same.

  • Lower ISO Settings (100-400): Ideal for bright conditions, such as sunny days, as they produce images with minimal grain or “noise.” For example, using ISO 100 outdoors on a clear day will give you crisp, clear shots.
  • Moderate ISO Settings (400-800): These settings are suitable for cloudy days or indoor lighting. Using ISO 400 allows you to capture good quality images without excessive grain, but expect some visibility of noise when using ISO 800 in dimmer conditions.
  • Higher ISO Settings (1600 and above): Perfect for low-light situations, such as indoors or nighttime photography. While ISO 1600 can help you capture images without a flash, be prepared for more noticeable grain. ISO 3200 can be used for very low light, but expect significant grain in the final image.

Modern digital cameras handle higher ISO settings much better than older film cameras did, significantly reducing noise even at higher values. The key takeaway is to experiment with different ISO settings to see how they affect your shots. Don’t hesitate to adjust your ISO based on the lighting conditions—higher sensitivity can make a big difference in capturing those special moments.

Shutter Speed

Shutter speed determines how long the sensor (or film) is exposed to light. A fast shutter speed—like 1/500th or 1/2000th of a second—will freeze motion, but it lets in less light, so you may need to increase your ISO to compensate. Slower shutter speeds (1/60th of a second or lower) let in more light but can cause motion blur or camera shake. If you’re handholding the camera, try to stay above 1/60th of a second. If you’re using a longer lens, say 85mm, you may want to use 1/100th of a second or faster to avoid shake.

For stability with slower shutter speeds, a tripod is your friend. Just bear in mind that vintage cameras often have lower maximum shutter speeds, but those quirks deserve their own chapter.


Aperture and depth of field

Aperture controls how wide the lens opens to let light in, and it’s measured in f-stops. A smaller f-stop number (like f/2.0) means a wider aperture, which lets in more light and creates a shallower depth of field—ideal for those portraits with a soft, blurry background. A higher f-stop (like f/16) means a smaller aperture, which lets in less light but keeps more of the scene in focus—perfect for landscapes.

Aperture not only affects the amount of light coming through but also how much of your image appears sharp. The trick is finding the right balance for the look you’re aiming to achieve.

Conclusion

One of the great things about digital cameras is that you can experiment with these settings without worrying about the cost of film. You can see the results immediately and make adjustments on the fly. Most digital cameras offer different modes to help you control the exposure. For example, “Shutter Priority” lets you set the shutter speed while the camera adjusts the other settings. “Aperture Priority” does the same for aperture. If you’re more experienced, you can take full control with manual mode.

This is just the first in a series of articles designed for beginners, but it’s always helpful for even the more seasoned among us to revisit the fundamentals. If you have questions, feel free to leave a comment. No question is too simple, and I’ll do my best to respond.

Until next time, Dear Reader.

Post Scriptum

I’ve noticed many of you arrive at this site through this page (probably from Google), so welcome! This is just the first in a broader series on photography. If you found this article helpful, there’s more where this came from. I also cover topics like composition, gear choices such as the Pentax ME Super, which as its name suggests is rather Super, the differences between 35mm and medium format, and my approach to street photography.

My aim is to demystify photography. It doesn’t have to be complicated. Whether you’re just starting out or already have some experience, I hope you’ll find something useful here. Thanks for reading, and don’t hesitate to ask questions or leave a comment. I look forward to hearing from you.