The UK Chronicles: A Black and White Footnote


My usual approach to black and white photography is to shoot directly in black and white, either using black and white film or the Acros film simulation with my X100F. When using the X100F on this UK trip, my EVF displayed the black and white shot using Acros with a red filter—my go-to simulation. This method puts me in a black-and-white “frame of mind” from the outset.

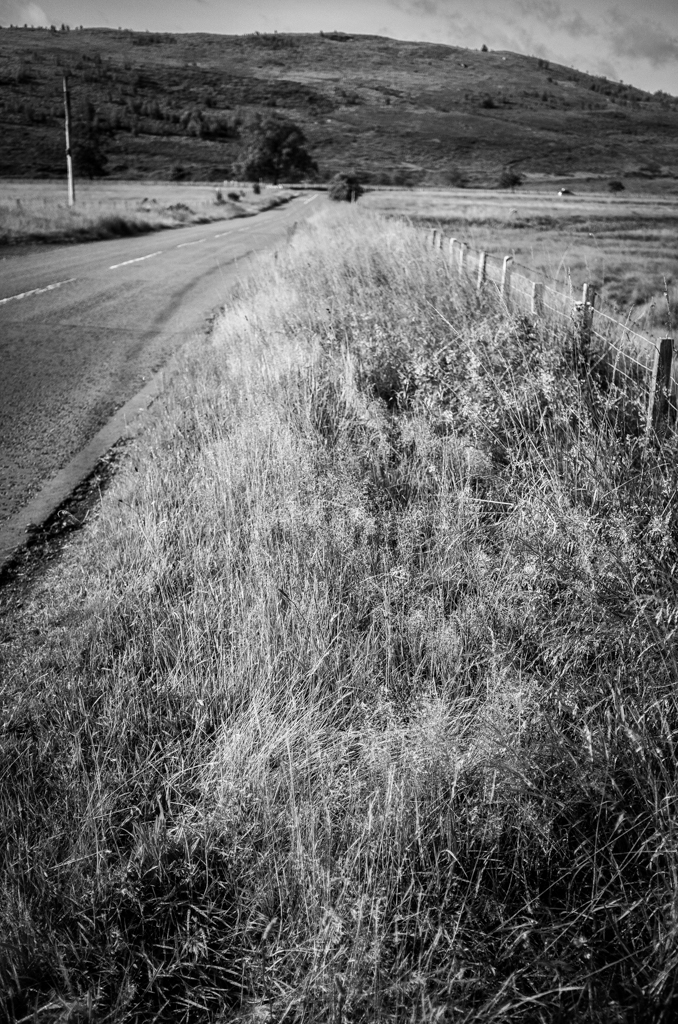
However, this time I decided to break from my usual practice and experiment. I did something I normally advise against—starting with the intention to create color images and only considering black and white later. I chose the Classic Chrome film simulation instead of Acros, focusing on capturing the vibrant colors of the Northumbrian countryside. It was all about breaking free from my black-and-white routine. Both color and black-and-white photography have their place, but for this trip, I wanted to prioritize one over the other. Still, wouldn’t it be intriguing to compare both approaches?

Back in France, as I prepared the images for my black-and-white Instagram feed, I began to wonder if some of the colorful shots might also work in black and white. Initially hesitant—given my emphasis on shooting with intention and purpose—I decided to embrace the experiment. I was breaking one of my own rules, yet the idea intrigued me.

Reviewing the color shots, I considered which might translate well into black and white. I look for images with texture and varying tones rather than just color. My composition is usually solid since I’ve already edited my color images, including reframing and straightening as needed. With digital RAW files, converting to black and white and producing different versions is straightforward. As they say, the goal is to produce images that reflect how they made you feel, not just how you saw them. This is why I convert my images to black and white—they capture more of the emotional essence.

Opening Adobe Lightroom on my PC, I saw the familiar images on my screen. My editing approach may seem finicky, but it’s effective. While the simplest way to convert an image to black and white is to slide the “saturation” slider to the left, this often results in a flat, lifeless image. Instead, I use a more nuanced approach to control various color tones in the black-and-white image. This technique helps preserve depth and character, ensuring that each image maintains its visual impact even without color.

Here’s how I approach black-and-white conversion in Lightroom:

  • Black and White Profile: Sets the overall tone and mood of the image.
  • Clarity: Enhances texture and detail for a more dynamic appearance.
  • Contrast: Adjusts the range between light and dark areas, adding visual interest.
  • Color Sliders: Modifies the luminance of specific colors to bring out different tones in the black-and-white image.
  • Highlight Tool: Adds subtle vignetting and balances highlights for a polished finish.

So, why convert to black and white after shooting in color? For me, it offers a classic, timeless aesthetic, and challenges me to create a “better” image by focusing on composition and texture without the distraction of color. This approach pushes me to craft photographs that rely on fundamental elements, enhancing their overall impact.

Impact is at the heart of photography. While I cherish the colors of the Northumbrian countryside and am eager to learn how to use color more effectively, I also deeply value the strengths of black-and-white photography. It’s about transcending color to create images that resonate through composition and texture.

But there’s something more personal about these black-and-white conversions. Perhaps it’s because I broke my own rules this time around, allowing color to take center stage and letting the black-and-white images emerge later. These images weren’t planned with black and white in mind—yet, despite that, or perhaps because of it, they feel even more special to me. Sometimes, going against what you think you know leads to unexpected results. And, in this case, those results resonate even more deeply.

Isn’t impact what we strive for in our photography? Don’t get me wrong—I love the colors of the Northumbrian countryside and am on a quest to learn how to use color more effectively. But I do believe in the strength of the fundamentals offered by black-and-white photography. Sometimes, breaking your own routine brings surprising rewards.

The Opening of the Film Archives—the Hangar à Bananes August 2016


In my last venture into the film archives, I talked about how there was a time that my daughter hadn’t yet seen me the way I see myself and how she actually still liked me, before turning into a teenager.  This is the second part of that special day.

We had explored the Jardin des Plantes and discovered what they had to offer.  This of course builds up an appetite in a young lady, and convinces her that she really needs to drink something Daddy.  And why couldn’t we go to the Altercafé (now the D3) at the Hangar à Bananes.

So what else was I to do but drive us to the Hangar à Bananes.  You will have seen the Hangar in this article, and you will now be completely up to date and know nearly everything there is to know.

Don’t forget that this is a girl who gets an idea into her head and then just goes through with it.  That idea is so rooted that it is nigh on impossible to change that idea.  I knew what was coming.  I would order a chocolate brownie, and Kate would have an Orangina.  I could have a beer.  How gracious of her.

She had been my model for most of the day and even a top model needs a rest, and just has nothing left to give a photographer.  You just know when enough is enough…

In Defense of Film


Is film photography too expensive? Think again! Many assume that shooting film is a hobby reserved for the wealthy, but it doesn’t have to be. With the right approach, you can enjoy the unique aesthetic and creative process of film photography without breaking the bank. In this article, I’ll share my personal experiences and tips for saving money on film, developing, and gear, proving that the joy of film is accessible to everyone.

Often, even the tiniest things can spark a desire to write. In the infamous world of internet comment sections, people can have different opinions—a good thing, as it makes us reflect on our own positions. It challenges our perceived wisdom and questions us in ways that can be disarming. What’s obvious to me might not be to someone else.

I was talking to an Australian lady, likely of my generation since our photography journeys started the same way—with film. Except this lady has gone fully digital, keeping her film cameras as a reminder of her film days being over. Less hassle, less expense, less stress, and less “faffing about,” she said.

At first, I was taken aback. I love the film aesthetic in my photography. I like the predictability of film grain, as opposed to digital noise. But most of all, I’m in love with the process. I love the slower pace of film photography—none of this “spray and pray” nonsense. I appreciate how I become more mindful when shooting film, as each shot counts. I like the way an old film camera looks around my neck. And as the internet meme says, “I know about photography. I’ve been initiated into the exclusive circle of purists.”

The lady talked about the prohibitive prices of film and labs, which, let’s be honest, is a valid point.

Costs of Digital vs. Film Photography

I’ll talk about my kit and initial outlays compared to my film expenses. I bought my latest two digital cameras in late 2017 and 2018. My X100F cost around €1400, and my Canon 6D Mark II around €1200. I spent about €300 on a teleconverter for the X100F, and I probably have about €2500 worth of kit for the Canon, including speedlites, lenses, and filters. Then there’s the Fujifilm XT2, bought second hand for €400, with a couple of lenses totaling around €500.

This kit, though older, works well and is largely sufficient for my needs. As mentioned in my article “I Want It, But Do I Need It?”, I’d like a Leica, but do I need one? Would I refuse one if someone gave me one? Heck no! You can see the results throughout this site, and the images are great.

Let’s move on to film. Yes, if you love that Kodak Portra look, you’ll be spending a pretty penny. I have a certain nostalgia for the days when the prices hadn’t doubled. But—and this is important—not all film photography has to be done using Kodak Portra. There are more accessible films, especially black and white, that cost less. A roll of Fomapan 100 costs me around €5.50. So for less than the price of a pint of Guinness, I can get 36 shots. For a little more, I can go with Kentmere or even Ilford black and white film. I still have one roll of Portra left and a pack of five Tri-X medium format rolls.

Developing at Home

Ah, but then you have to send them to a lab to be developed. Again, a valid point. The cost for developing colour film where I go is less than €7 per film. I’ll share a little secret: I invested in a kit to develop my films at home. It cost about €140 initially, but now all I worry about is buying the chemistry. Yes, €30 for a developer seems steep, but I can develop 16 to 24 films with a bottle, depending on the dilution. I also invested €250 in a film scanner to produce digital files for editing.

Collecting Film Cameras

You might have noticed that I’ve talked about film but not film cameras. I started collecting a while back before hipsters raised the prices in the secondhand market. The most I paid for a film camera was just over €100, and the cheapest was €15. These film cameras are generally solid, and the lenses are great. The technology, though a little less modern (understatement of the year!), still works, and older cameras don’t even need batteries. And even those that do, the batteries last for ages. None of this “Do I have spare batteries for the X100F?” nonsense.

Each shot is taken on a brand new “sensor,” compared to shots on a digital sensor. And less dirt gets onto this sensor.

The Joy of Film

Don’t get me wrong, I love digital photography for its convenience and spontaneity. I can see my images right away and get instant feedback and gratification. With film, that gratification isn’t instant. You have to be patient and wait, but for people of my generation, that might be infuriating, it’s something we grew up with and accepted. I continue to accept it.

I enjoy using a machine sometimes older than me, knowing the image quality will be there. I know that with a certain film, I’ll get a certain result. I like the slower pace. If you visit the Film Photography page or the Film Archive page, you can decide for yourself if it’s worth the hassle, the expense, the stress, and the “faffing about.” I think it is, and I maintain that film has as much a place in photography as it ever did.

The Future of Film

Does film have a future? I think it does. Leica has relaunched the M6, Pentax has the new Pentax 17, and Kodak has the Kodak Ektar H35. The disposable cameras of yesteryear are still being produced and it has become the fashion to us them at weddings for that affordable yet classic look of film. Film photography continues to be popular with Gen Z and millennials. Case in point: my 25-year-old son nicked one of my Kodak Retinette 1B’s and a roll of film. I suspect my daughter might have her eye on one of my film cameras, too.

One thought came to mind whilst answering one of comments with the person saying that they “will never go back.”  I am old enough to remember when microwaves fist came out.   They were sold to us as being thoroughly modern and machines that could do everything so quickly and conveniently.  Except they couldn’t.  For certain tasks on the kitchen they are wonderful and far exceed the way we “used” to cook.  But they can’t do everything.  They have their place in the kitchen.  And will always will do.  But a slowly simmered boeuf bourguignon that infuses its odours through the kitchen will always have a special place in my heart.  Much like using film to capture my images…

The Opening of the Film Archives—Jardin des Plantes August 2016


There was a time when my daughter wasn’t a teenager.  There was a time when she quite liked her Dad, and she would accompany me everywhere.  It was good being that child’s hero.  It was a more innocent time.  It was a time when she actively tried to spend time with me.  It was a time when she didn’t see me the way I see myself…

One of her favourite places in Nantes was the Jardin des Plantes, a huge botanical garden in the middle of Nantes just across the road from the station.  I could talk about the fact of it being a haven of peace in the bustling city.  I could talk about it being an oasis of green in a sea of concrete.  I could talk using clichés ‘til the cows come home…

These photographs are not clichés, but real attempts of capturing a specific moment in time allowing me to travel back through time.  And looking at these images, I’m definitely back in time.

Let me introduce you to my daughter from 2016.  She was a 7 year old that already knew what she wanted but was slightly more subtle about it.  She would suggest that we go into town.  That I could take my camera.  That we could go to such and such a place.  That we could do such and such a thing.  And all this as if it were completely natural.  And I was a very willing victim.   

This time she suggested going to the Jardin des Plantes.  She would take her camera (my old Sony bridge) and I would take my Olympus Trip 35.  I used the Olympus Trip quite a lot at that time and its ease of use, the zone focussing, and general lack of buttons to press, made it quite the fool proof piece of kit.    

As usual, I let her lead the way.  This was here outing after all, and kept a respectful distance, so I could photograph her and record her for posterity.  The Jardin des Plantes has not only plants, the clue is in the title, but also is the backdrop to the Voyage à Nantes, and certainly was that year.  

I think the images speak for themselves and I’ll let you peruse them at your leisure.  They were taken on Ilford HP5 Plus film shot at box speed.

I want it, but do I really need it?


The camera gear industry is a powerful beast and it tries to convince us that this piece of kit, that is conveniently in stock, will help you become that photographer that you are destined to be.  Be that in magazines, be that in youtube influencer videos that “try out the camera” that the manufacturer has just lent us to show you what it’s like.  I’ve watched loads of these videos especially when thinking about the kit I wanted to buy.  Come on in and I’ll make sure you have the best camera possible, and the best possible lens.  What’s your budget?  OK, I’m sure we can work something out.  What kind of photography do you want to do?  Well, you’ll need this, and this, and this, etc.

That nice man in the shop will be more than happy to take your money and sell a high end camera that will be a thing of beauty.  But look at the title again.  “I want it, but do I really need it?”  You have fallen into their trap.  I’m not trying to put down these sales people, and their wealth of knowledge, but know that there are other options out there.

I’m going to dare say it.  You don’t need the latest and greatest equipment to take great photos.  Instead prioritise value, and mindful shooting, over gear acquisition.  Think about boys and toys.  I get exactly the same feeling as you when I enter a camera store.  I want it all.  Of course I do.  Who doesn’t?  But,what would my wife say?  What would my bank manager say?  What would reason tell me instead of letting my emotions get the better of me?  Can I really justify this acquisition?  Do I really need it, or is there a less onerous solution?  I know.  I’ve just pissed on your bonfire, but it’s time for a reality check here…

So what can I do about that?  You can realise that there is a huge market of second hand gear out there.  I have taken this route in the past and have no regrets.  Yes, I did it my way…

Where do you go to discover all these hidden gems?  There is of course E-Bay, that huge online auction site which I used to acquire the majority of my film cameras.  When I was a customer of the site the film cameras were fairly cheap, since those pesky hipsters hadn’t cottoned on to the fact that film photography is cool.  So yes, each purchase was a gamble, but I had less money to lose, and the return would be greater.  The old cameras were simpler, the lenses were great, and there are still lots of examples of reasonable cameras out there.  Would I use it for digital?  Probably not.  I’m not really a gambling man, and don’t have a huge wad of cash that I am willing to possibly waste.

But E-Bay is not the only option.  There are various online sites such as mpb.com that have a very good reputation, and have tested each piece of equipment that they sell.  They give you an honest appraisal of the piece of kit and are honest about the state of said piece of kit.  They guarantee each purchase, and have a generous returns policy.  I might consider using it if I were interested in buying some new kit.  But at the moment I’m not.  There are also second hand areas of our beloved camera shops that will have used gear.  

When buying second hand, you will generally be spending less money, or at worst, getting more kit for your hard earned cash.  Older models of camera might not be as super duper as the latest models that look so sexy in that shop window, but for what most us mere mortals need, they are more than adequate.   You really have to look at which features are most important to you.  Thanks to you, there will be one less camera going to landfill.

Talking of features, let’s talk about the 80/20 rule.  For 80% of your photographs, you will use about 20% of your gear, and features on your camera. I urge you to identify the essential features for your type of photography (e.g., autofocus, image stabilisation, dynamic range), and maybe avoid spending money on features or lenses that you won’t use frequently.  Shutter speed when doing sports photography, or high dynamic range for landscape photography.  Is an F1.2 lens really what you need, or will F2.0 pr F2.8 still get the effect you want?

I’m going to talk about the X100F (again!) and compare it to the latest version from Fujifilm, the X100V and the X100VI

FeatureFujifilm X100FFujifilm X100VFujifilm X100VI
Sensor24.3MP APS-C X-Trans CMOS III26.1MP APS-C X-Trans CMOS 440.2MP APS-C X-Trans CMOS 5 HR Sensor
Lens23mm f/2 (35mm equivalent)23mm f/2 (35mm equivalent) with improved optics23mm f/2 (35mm equivalent) with further improved optics
Autofocus91-point hybrid autofocus425-point hybrid autofocus with improved face/eye detection425-point hybrid autofocus with further improved face/eye detection and subject tracking
ViewfinderHybrid viewfinder (optical/electronic)Hybrid viewfinder (optical/electronic) with improved EVFHybrid viewfinder (optical/electronic) with a larger and higher resolution EVF
Screen3-inch fixed LCD3-inch tilting touchscreen3-inch tilting touchscreen
Image StabilisationN/AN/A6-Stop In-Body Image Stabilization
Video1080p up to 60fps4K up to 30fps6.2K (cropped) and 4K up to 30fps
Weather SealingNoYesYes
Price (approx.)€800-€1000 (used)€1300-€1500 (used)€1700-€1800 (new)

Key Takeaways:

  • Sensor: The X100VI offers a significant resolution upgrade with its 40.2MP sensor, providing greater detail and flexibility for cropping compared to the X100V and X100F.
  • Lens: All three models share the same focal length, but the X100V and X100VI feature improved lens designs for better sharpness and close-focus performance.
  • Autofocus: The X100V and X100VI offer a substantial upgrade in autofocus points and performance compared to the X100F, making them better suited for fast-moving subjects and low-light situations.
  • Viewfinder: The X100VI has the most advanced viewfinder with a larger, higher resolution electronic viewfinder (EVF) and improved refresh rate.
  • Screen: The X100V and X100VI have tilting touchscreens, which can be helpful for composing shots from awkward angles, while the X100F has a fixed screen.
  • Video: The X100VI boasts the most advanced video capabilities, offering 6.2K recording with a crop, while the X100V is limited to 4K, and the X100F to 1080p.
  • Weather Sealing: Both the X100V and X100VI offer weather sealing, making them more durable in adverse conditions compared to the X100F.
  • Price: The X100F remains the most affordable option, especially on the secondhand market. The X100V offers a good balance of features and price, while the X100VI is the most expensive but comes with the latest technology.

Ultimately, the choice depends on your budget, needs, and priorities. If you need the highest resolution and advanced video features, the X100VI is the way to go. If you prioritize value and portability, the X100F is still a great option. The X100V sits in the middle, offering a good balance of features and price.

If you are a professional, then I think the same logic will apply.  Even though a nice kit is an investment you need to consider the returns on your investment?  Is the purchase justified and will it bring more work for you?  Will it expand my offer enough?  If you are an amateur, then you can spend any amount of money you want, but if you could do more, with less, wouldn’t that be an appealing option? Have I not managed to convince you yet? Look at the film archives… And look at the pictures from the X100F

Optimizing Images On-the-Go: Mobile Photography Editing Guide


Introduction

As the title suggests, I will describe my workflow when out and about. While there are surely other ways to do it, this is my method. It works and has stood the test of time. I usually wander around taking photos, then find a café to sit down and transfer my images to my phone. Everything is better with a nice cup of tea (or coffee) and a piece of cake.

Downloading Photos to Your Phone

Most cameras today can connect to phones via Bluetooth or Wi-Fi. My two Fujis (X100F and XT2) and my Canon (6D Mark II) certainly can. I enable Wi-Fi on my camera and connect it directly to my phone. Next, I open the corresponding app—Canon Camera Connect for my Canon and Fujifilm Camera Remote for my Fujis. Each manufacturer provides its own app for Android or Apple devices. Once the camera is connected to my phone, I can import my photographs, selecting the images I prefer.

Sorting Photos

Now comes the fun bit: sorting through all those wonderful shots you took and deciding which ones are worth working on and editing. When I transfer my images from my camera to my phone, the phone creates a folder for the imported photos. Different apps will put them in different places, so I’ll leave that to you to manage. As a rule of thumb, you will see them in the gallery app, which will show you your latest photos.

In the gallery app, you can sort your photos by date taken, favourite images, or the place where the photo was taken.

I will assume you have read my last few articles on Photography 101, composition, and the types of lenses available and how to use them, or at least how I use them. If you haven’t had that pleasure, then go and have a read…

Is the photo worthy of publication, and are you happy with it representing your talent as a photographer? Is the image in focus? Is the image well exposed? Does it fulfil its storytelling role? Will it add to your narrative? Or simply, do you like it enough to want to share it?

Let’s assume that you answered yes. You then get to share your image to Snapseed.

Editing in Snapseed

Starting with Styles:

I like to begin by using the “Portrait” style. It is a preset that gives the photo a subtle glow and some vignette. I just seem to like it, and when you have something you like that flatters your image, you are tempted to stick with it. Most times, this will work a treat on well-exposed images. But let’s imagine that you have exposed for the highlights and that your shadows are “too dark” and you want to bring them up a bit. Then I would go to the “Tools” section and use the Tune Image.

En aparté:

When exposing in digital photography, we expose for the highlights, as it is easy to lighten, or “bring up” the shadows, and we don’t want to “blow out” our highlights and just turn it into a mass of white. In film photography, it’s the opposite. We expose for the shadows, as film has more difficulties capturing details in the shadows especially in a photo with lots of light.

Using the Tools

As I inferred in the title, this is my workflow, and shows the way I use Snapseed. There’s a whole load of tools to stylise your image and to completely change the look of it, but I’m more of a “less is more” disciple when editing. Also most apps out there will have similar tools, so you can carry this knowledge with you across the board.

Crop Tool:

One thing I learnt early one is to KISS, i.e. Keep it simple stupid. Sometimes I will have an element in my photo that distracts from my subject. With the crop tool I can just crop the image and make it disappear. I can also use the crop tool to format the image to fit certain social media post settings. I’m thinking about you Instagram and Facebook. Try searching google for social medi formats and you will be inundated with results.

Healing Tool:

Sometimes the crop isn’t enough to take away distracting elements from our photo. You might have a beautiful shy and want to get rid of that Jumbo Jet in the sky. One way of doing that is to wait until the Jumbo Jet has flown away, but let’s say that it’s too late… Using the healing tool will clone part of the image and replace the Jumbo Jet that just wants to noticed and validated man! To get the best results it’s better to zoom into the image and have a smaller area to work on.

Tune Image:

This is where I do the basic edits, bringing up the shadows or bringing down the highlights. I usually keep it to that. At a push, I will bring up the brightness if the photo has been underexposed. Somtimes I will add a little contrast but I tend not to use the other tools. I don’t want to denautre the photograph.

Rotate Tool:

We should always try and keep our horizons straight, except when making the conscious decision not to. The rotation tool tries to straighten what it thinks should be straight. It generally works quite well, but you do have total control as well as a grid to check the lines in your photo.

Brush Tool:

This is where we can do our burning and dodging. You can choose to highlight a certain area and darken others to emphasise your subject. This brings the photo to life. There are tutorials galore on YouTube that go into more detail than I will in this “basics” article.

Black and White Tool:

Welcome to the world of black and white conversion. It’s a process that a majority of my photography goes through. You can, of course, just use the saturation tool in the “Tune Image” section, and you will get a monochrome image. But you can do so much more.

So, let’s do so much more. The black and white tool offers you some presets which might correspond to your taste. I tend to leave them alone and instead press on the circle that will give a series of colour filters to choose from. This is a direct link back to black and white film photography, and you know how much I love that. I love using the red filter, which, as in film photography, will make your blues darker. This is beautiful for those landscape photos where you want a dark sky to complement those fluffy white clouds.  It’s also my default film simulation on the X100F that I use for all my street photography.  It’s just a look that I fell in love with years ago.
The other common filters are all covered too.

  • Orange:  Orange filters give stronger effects than  yellow filters but are not as bold and dramatic as a red. It is therefore an ideal choice to span the effects given by both these filters.  Blue skies will be recorded in very dark tones on the print, giving bold contrast between the sky and clouds. An orange filter will also penetrate haze and fog. Most flowers will be recorded with a significant difference in tone from the surrounding foliage giving impact and effect.
  • Yellow, the general purpose black and white filter,
  • Green:  When photographing foliage in black and white, a green filter is used almost exclusively.  It lightens green foliage, which is particularly important with dark green leaves which can record very dark without a filter. It therefore gives a more natural, lighter feel to the photograph.
  • Blue: A blue filter is not often associated with black & white photography however, it can really add “mood” to a photograph by increasing the effect of haze or fog.  It also lightens blues and darkens yellows, oranges and reds which helps separation in scenes containing a mix of colours.

Export

You have two options.  You can either press on “done” and Snapseed will record your image in the Snapseed folder and in your gallery in the Album neamed Snapseed, or you you can press “share “and you will be presented with various options on how to share your image, to Instagram, via gmail etc.

Before you do that you can press on settings where you can change the resolution of the image that will be exported.  This can help if you need to reduce the image to take up less space on your phone, or if you’re loading the photo up to a website and you require a “lighter” image.

Conclusion

You now have an idea about how I edit my images on the go, and the more time goes on, the more I do it this way.  Is it the same as Lightroom on my computer?  No.  I can’t have as much control as in Lightroom. I can’t batch edit, I can’t do this or that, but I can manage without, especially on the go.  There are of course other options for photo editing on the go like Lightroom mobile,VSCO, your native photo editor app on your phone.  As I said at the beginning of the article this is how “I” do things.  It works for me.  Try it out and it might just work for you too!